Disaster Recovery
Disaster Recovery enables you to minimize downtime for Virtual Servers if the Compute Resource hosting them experiences a disaster scenario (for example, hardware failure, data center outage, and so on). This is done by restoring the latest backups of the affected Virtual Servers to one or more different, healthy Compute Resources.
In this topic, you'll learn how to do the following:
- Offer Disaster Recovery to users.
- Configure Disaster Recovery for Compute Resources.
- Perform Disaster Recovery.
- Clean up once a Disaster Recovery process has finished.
Overview
When there is an outage and the users' Virtual Servers are down, time is of the essence. Prolonged downtime and the associated SLA violations can lose you money and damage your reputation. Disaster Recovery enables you to bring the affected Virtual Servers back online as soon as possible, and with minimum effort.
Here is what happens when a Virtual Server hosted on an offline Compute Resource (called the source Compute Resource) is recovered to a different, healthy and compatible Compute Resource (called the destination Compute Resource):
-
The Virtual Server is recreated on the destination Compute Resource. Its configuration, including the IP and MAC addresses, remains the same as it was on the source Compute Resource.
-
The Virtual Server's data is restored to the destination Compute Resource from the Virtual Server's latest backup.
-
If the Virtual Server was running at the moment of the outage, it is started.
Compared to restoring Virtual Servers from backup by hand, Disaster Recovery has the following benefits:
-
Any number of Virtual Servers can be recovered with a few clicks. Once Disaster Recovery is configured, the process itself is straightforward.
-
Disaster Recovery allows restoring Virtual Servers' backups to Compute Resources other than those the Virtual Servers were originally hosted on.
-
Disaster Recovery can be offered to users as an incentive or a paid add-on, improving your value proposition.
Note
Before advertising Disaster Recovery to your users, we strongly recommend that you read this documentation topic in full, paying particular attention to the existing limitations. You must also configure Disaster Recovery for your Compute Resources (you will learn how to do so later in this topic).
Known Issues and Limitations
At the moment, the following limitations exist:
-
A Virtual Server can only be recovered if it has at least one valid backup.
-
Any changes to the Virtual Server's configuration and data made since the creation of the latest backup are lost.
-
Performing Disaster Recovery requires at least one healthy and compatible Compute Resource.
-
Virtual servers can only be recovered to a Compute Resource with a matching virtualization type. KVM virtual machines can only be recovered to Compute Resources that have the KVM virtualization type. VZ containers can only be recovered to Compute Resources that have the VZ virtualization type.
-
Virtual servers from Compute Resources imported from SolusVM 1 can only be recovered to other Compute Resources imported from SolusVM 1.
-
Disaster Recovery does not start automatically in case of an outage. It must be performed manually by the administrator.
-
To enable users to add Disaster Recovery when ordering Virtual Servers via WHMCS, you need to update the
solusvm2vpsmodule to version 1.0.55 or later.
Offering Disaster Recovery to Users
You can offer Disaster Recovery for free. You can also include it as a bonus feature in your more expensive plans, or use it as an upsell opportunity, charging extra. To make Disaster Recovery a paid feature, you need to include it in your plans.
Note
If you are selling Virtual Servers via WHMCS, learn how to make Disaster Recovery available to users in WHMCS.
To include Disaster Recovery in a plan:
-
Go to Compute Resources > Plans.
-
Click Add Plan to create a new plan, or click the corresponding
 button to edit an existing plan.
 -
Select the "Offer backups" checkbox (this is necessary for Disaster Recovery to function), and then select the "Offer disaster recovery feature" checkbox.
-
(Optional) To make Disaster Recovery a paid feature, specify what percentage of the base Virtual Server price it will cost by entering the desired value into the "Disaster recovery price in %" field. You can enter a value between 0 and 100 percent. By default, the value is zero, making Disaster Recovery free.
-
Once you are done, click Save.
Warning
Enabling backups and Disaster Recovery for a plan does not mean that Disaster Recovery is now possible. You must also configure Disaster Recovery for your Compute Resources (you will learn how to do so later in this topic). This must be done in advance to make Disaster Recovery possible.
Configuring Disaster Recovery for a Compute Resource
To make it possible to recover the Virtual Servers hosted on a Compute Resource, three requirements must be met:
-
There are one or more healthy and compatible destination Compute Resources. We will explore what "compatible" means further in this section.
-
Those Compute Resources have enough available resources (RAM, VCPU, and free disk space) among them to host all Virtual Servers being recovered.
-
Every Virtual Server you want to be able to recover has at least one backup. We recommend backing virtual servers regularly and often. Having a recent backup maximizes the chances of recovering the Virtual Server as it was at the moment of the outage.
If even one of these requirements is not met, Disaster Recovery may be impossible. We will show you how to verify that these requirements are met further in this section.
Verifying the Availability of Destination Compute Resources
At any given moment, some Compute Resources in your cluster may be ready for Disaster Recovery, and others may not be. To learn what Compute Resources are ready for Disaster Recovery, and also what prevents others from being ready, you can visit the Disaster Recovery > Resilience Status page.
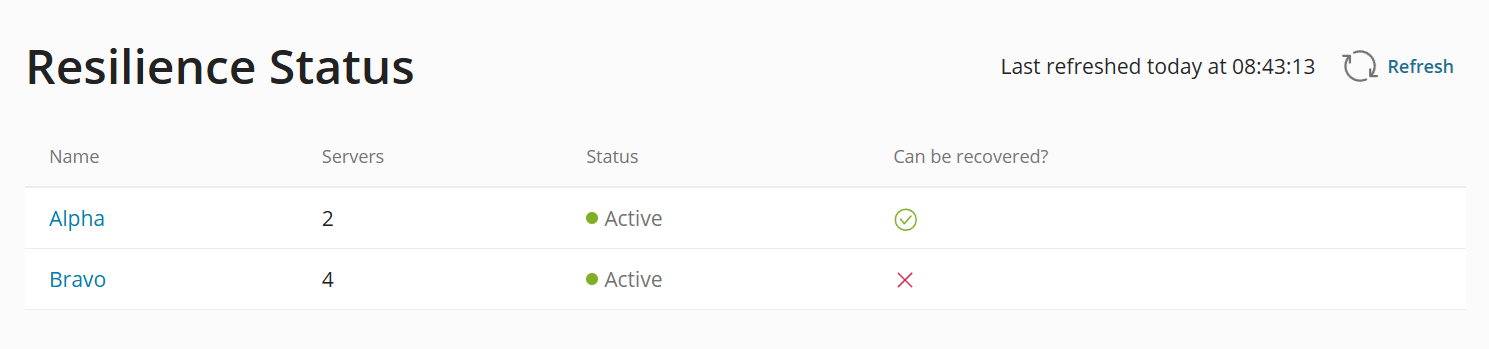
On this screenshot, you can tell that the Virtual Servers on the "Alpha" Compute Resource can be recovered because of the  icon in the "Can be recovered?" column. The "Bravo" Compute Resource is marked by the
  icon. This means that it cannot be recovered.
Troubleshooting Issues Preventing the Availability of Destination Compute Resources
To learn what prevents a Compute Resource from being ready for Disaster Recovery, and also what Virtual Servers hosted on that Compute Resource can be recovered, click its name.

Here, you can see the list of all other Compute Resources in your cluster, both compatible and incompatible. The Compute Resources showing the icon in the "Overall" column are compatible. Those showing the  icon are not. As long as at least one other Compute Resource is compatible, Disaster Recovery is possible for the selected Compute Resource.
A Compute Resource is compatible as long as it meets all the necessary criteria. To make identifying the issues preventing any given Compute Resource from being compatible easier, the criteria are separated into categories. Some of those issues can be fixed to make a Compute Resource compatible. Some cannot, making the Compute Resource fundamentally incompatible with the selected Compute Resource.
Note
You can click any icon to learn more about the specific issue(s) preventing the Compute Resource from being compatible with the selected Compute Resource. For example, clicking the icon in the "IP blocks" column will tell you what IP blocks are missing from the corresponding Compute Resource.
| Column | Issue | Resolution |
| Status | The destination Compute Resource is not running or its SolusVM Agent is not reachable. | Make sure that the destination Compute Resource is online and available over the network. Also, make sure that the SolusVM Agent on the destination Compute Resource is running and can be accessed from the management node. |
| IP blocks | The destination Compute Resource is missing one or more IP blocks present on the source Compute Resource. | Add the missing IP blocks to the destination Compute Resource. |
| Virtualization | The source Compute Resource hosts one or more VZ Virtual Servers, but the destination Compute Resource only supports KVM Virtual Servers, or vice versa. | Add the missing virtualization type to the destination Compute Resource if possible, or select a different destination Compute Resource with the matching virtualization type. |
| Storage | One or more types of storage present on the source Compute Resource are missing from the destination Compute Resource. | Add the missing types of storage to the destination Compute Resource. |
| Source | The source Compute Resource was imported from SolusVM 1. | Select a different destination Compute Resource, one that was also imported from SolusVM 1. |
| Architecture | The architecture of the source and destination Compute Resources does not match (for example, x86-64 and ARM). | Select a different destination Compute Resource with the matching architecture. |
| Capabilities | Some capabilities of the `libvirt` daemon present on the source Compute Resource are missing from the destination Compute Resource. | Make sure that the destination Compute Resource is online and available over the network. Change the `libvirt` configuration on the destination Compute Resource. |
To be able to use Disaster Recovery, make sure that there is at least one healthy and compatible destination Compute Resource for each Compute Resource you want to be able to recover.
Verifying the Availability of Virtual Server Backups
Even if a Compute Resource is ready for Disaster Recovery, some Virtual Servers hosted on it may not be. A Virtual Server can only be recovered if it has at least one backup.
Note
Disaster Recovery is possible even for Virtual Servers that do not have Disaster Recovery enabled. The only requirements for recovering a Virtual Server are that it has at least one valid backup, and that there is at least one healthy and compatible destination Compute Resource.
The current state of backup coverage for a Compute Resource can be found on the Disaster Recovery > Resilience Status page.

Here, you can see how many Virtual Servers hosted on the selected source Compute Resource have backups, making them eligible for Disaster Recovery. This information is shown separately for Virtual Servers that have Disaster Recovery enabled, and for those that do not.
-
The "Status" column shows the
icon if every Virtual Server in the category has a backup, and the icon otherwise. -
The "Available" column shows the number of Virtual Servers that have at least one backup.
-
The "Expired" column shows the number of Virtual Servers that have at least one backup, but no backups created within the last seven days.
-
The "Total" column shows the total number of Virtual Servers.
-
The "Without backups" column shows the number of Virtual Servers that do not have any backups.
Verifying the Availability of Resources
Even if a Compute Resource is ready for Disaster Recovery and every Virtual Server hosted on it has a backup, that does not mean that all Virtual Servers hosted on it can be recovered. Virtual Servers can only be recovered if there is enough resources (RAM, VCPU, and free disk space) among all compatible Compute Resources to accommodate all of them.
The current resource availability can be found on the Disaster Recovery > Resilience Status page. The information is shown separately for the following groups of virtual servers:
-
Those with Disaster Recovery enabled.
-
Those without Disaster Recovery enabled but with at least one backup (and thus also eligible for Disaster Recovery).
-
All virtual servers combined.
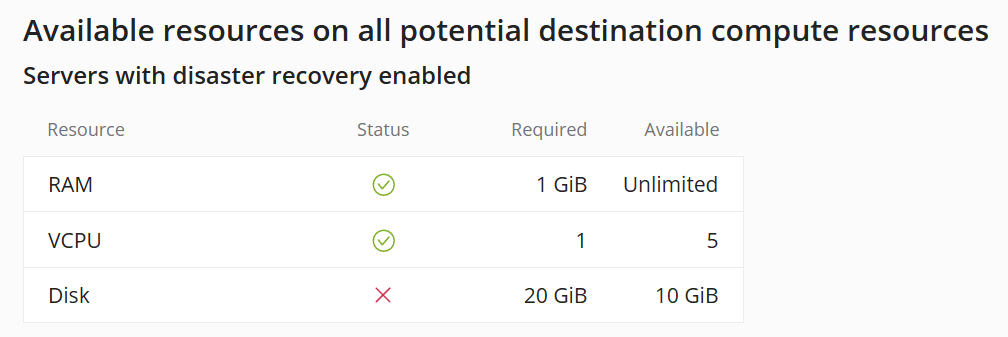
On this screenshot, you can see that Disaster Recovery is not possible because the compatible destination Compute Resources do not have the necessary amount of free disk space between them.
Configuring the Maximum Number of Concurrent Restores
When a Disaster Recovery process is started, the Virtual Servers selected for recovery will be recreated and restored from backups, one by one. You can speed up the recovery process by increasing the number of Virtual Servers that can be restored at once. This is done by setting the desired "concurrent restores" value for both the destination Compute Resource and the Backup Node(s) the backups are stored on.
Note
There is no recommended, one size fits all "concurrent restores" value. The maximum value that can be set without compromising the cluster's performance depends on a number of factors, such as the Compute Resources' computing power and available RAM, the network bandwidth, the I/O performance of the storages connected to Compute Resources and Backup Nodes, and so on.
To configure the maximum number of concurrent restores for a destination Compute Resource:
-
Go to Compute Resources, locate the desired Compute Resource, and then click the
 button.
 -
Under "Concurrent Backups", set the "Restore" value to the desired maximum number of Virtual Servers that can be restored concurrently, and then click Save.
-
Go to Backups > Backup Nodes, locate the Backup Node storing the Virtual Server backups for the source Compute Resource, and then click the
button. -
Under "Concurrent Backups", set the "Restore" value to the desired maximum number of Virtual Servers that can be restored concurrently, and then click Save.
-
If the Virtual Server backups for the source Compute Resource are stored on two or more different Backup Nodes, repeat steps three and four for each such Backup Node.
The maximum number of concurrent restores should now be equal to the number you entered. You can see the currently configured "Max. concurrent restores" value for every destination Compute Resource by going to the Disaster Recovery > Resilience Status page and clicking the name of a Compute Resource.

Here, the currently configured "Max. concurrent restores" value is two. If the value being shown is not the one you expected to see, repeat the steps above. Keep in mind that the "Max. concurrent restores" value is equal to the lowest "concurrent restores" value among those configured for the destination Compute Resource and the Backup Node.
Performing Disaster Recovery
Compute Resources that are not running or whose SolusVM Agent is not reachable (for example, due to some outage or malfunction) are eligible for Disaster Recovery. You can see the list of Compute Resources eligible for Disaster Recovery on the Disaster Recovery page.

Note
"Eligible for Disaster Recovery" does not mean that any or all Virtual Servers hosted on the affected Compute Resource can be recovered. For a successful recovery, a compatible destination Compute Resource must exist, and the hosted Virtual Servers must have backups.
You can also make a healthy Compute Resource appear on that page in two ways:
-
(Recommended) By shutting the Compute Resource down.
-
(Not recommended) By either stopping the SolusVM Agent on the Compute Resource or filtering the port it listens on (6767 by default).
Note
The latter option is fine, for example, when you want to test the feature. However, if you plan to recover one or more Virtual Servers, restarting the SolusVM Agent will not make SolusVM register that the recovered Virtual Servers are now hosted on a different Compute Resource. This is likely to cause network conflicts, as the Virtual Servers would be assigned the same IP addresses on both the source and the destination Compute Resources. To avoid this, stop the source Compute Resource, and then start it again.
If one or more Compute Resources are shown on the Disaster Recovery page, and it is not because you manually shut them down or stopped their SolusVM Agent, there may have been some outage or malfunction. Before beginning disaster recovery, we recommend trying to access the affected Compute Resource(s) via SSH, and if successful, verifying that the SolusVM Agent is running and is reachable from the management node.
If you know for a fact that there has been an outage or failure, or if you are unable to access the affected Compute Resource(s) via SSH, we recommend that you start a Disaster Recovery process.
Starting a Disaster Recovery Process
To start a Disaster Recovery process:
-
Go to Disaster Recovery.
-
Click the name of the Compute Resource you want to recover.
-
Select the checkboxes corresponding to the Virtual Server(s) you want to recover. You can also click Disaster recovery enabled to select all Virtual Servers with Disaster Recovery enabled that have at least one backup, or Backups to select all Virtual Servers with at least one backup.
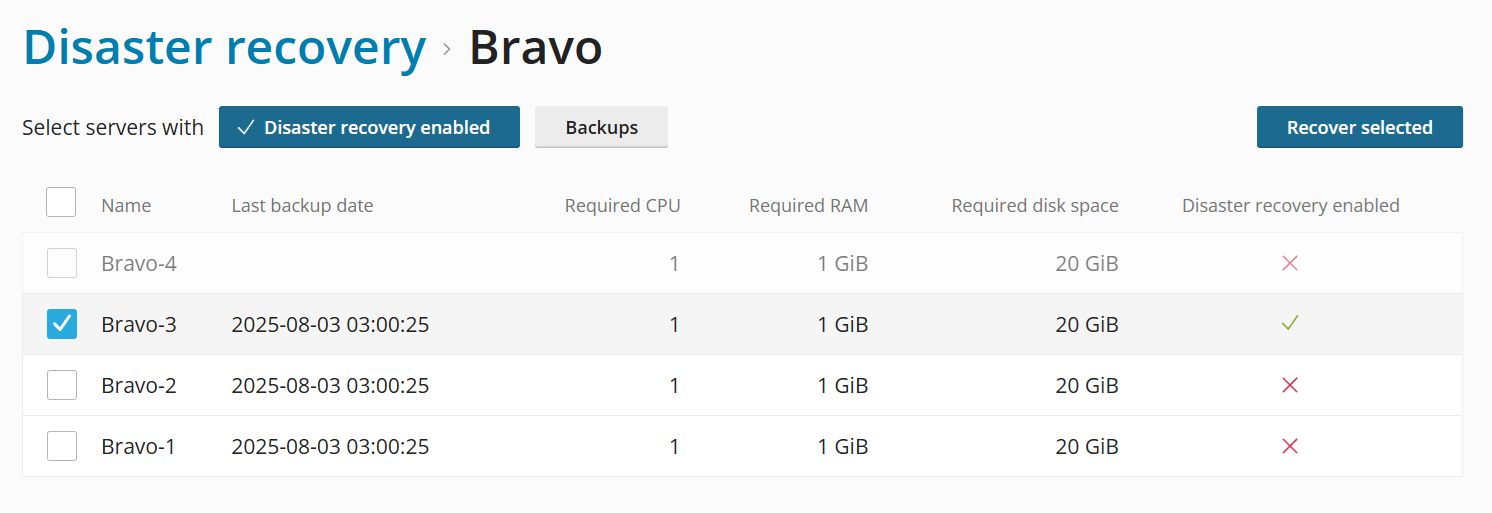
Note
A Virtual Server without Disaster Recovery enabled can still be recovered as long as it has at least one backup.
-
Click Recover selected. The "Recover Compute Resources" window will open.
-
If desired, set the "Destination Compute Resource selection method" toggle to "Manual", and then select the desired destination Compute Resource(s) from the menu. Otherwise, if the toggle is left at "Auto", the destination Compute Resource(s) will be determined automatically by the load balancing algorithm.
-
Under "Available resources", verify that the selected destination Compute Resource(s) have enough RAM, VCPU, and free disk space available to accommodate all Virtual Servers being recovered. You will not be able to start the Disaster Recovery process unless this requirement is met.
-
If desired, select the "Notify server owner(s) via email" checkbox to have SolusVM send an email to the owners of the Virtual Servers being recovered. You can use the default email template, edit it, or write your own and paste it into the "Notification text" window.
-
Click Start disaster recovery, and then click Start to start the Disaster Recovery process.
The Disaster Recovery process has started. You can monitor its progress on the Disaster Recovery > Activities page.
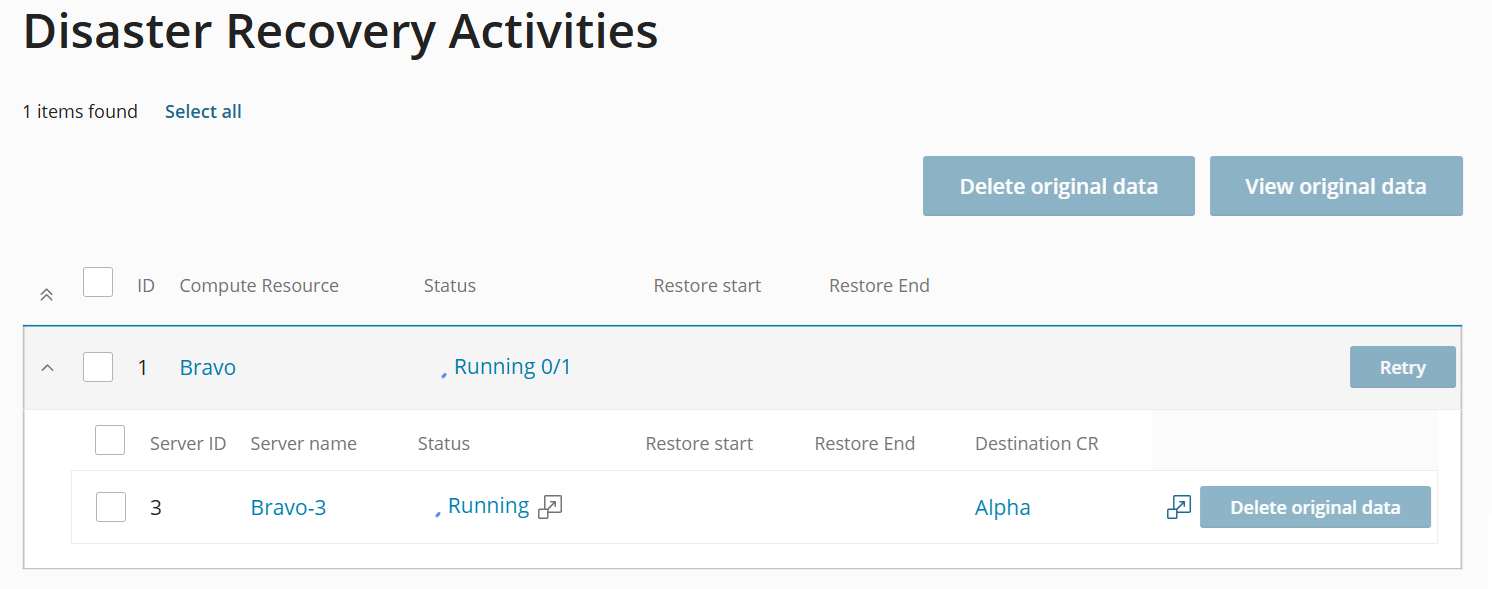
If the Disaster Recovery process fails for any reason, we recommend that you troubleshoot the root cause. To learn about the specific error(s) that caused the failure, click the  button next to the "Failed" status.

Once you have removed the root cause, click Retry to start a new Disaster Recovery process.
During the Disaster Recovery process, keep in mind the following:
-
The maximum number of Virtual Servers being recovered at the same time cannot exceed the "Max. concurrent restores" value. The greater the number of Virtual Servers being recovered and the smaller the "Max. concurrent restores" value, the longer the recovery process is going to take.
-
Once a Virtual Server has been recovered, it will automatically start if it was running at the moment the outage happened.
Cleaning up After Disaster Recovery
Once a Disaster Recovery process has finished, your next steps depend on whether you are able to recover the source Compute Resource or not:
-
If you are unable to do so, we recommend that you delete the source Compute Resource in the SolusVM 2 by clicking the corresponding
 button on the Compute Resources page.
 -
If you are able to do so, we recommend that you delete the Virtual Servers' original configuration and data using the SolusVM interface to avoid network conflicts and free up disk space. You should also consider migrating the virtual servers that have been recovered to avoid overcommitting the resources on the destination Compute Resources.
Viewing the Virtual Servers' Original Configuration
On the Disaster Recovery > Activities page, for every Virtual Server that has been recovered, there is an opportunity to view its original configuration.
To view the Virtual Servers' original configuration:
-
Go to the Disaster Recovery > Activities page.
-
Locate and click the desired Disaster Recovery process.
-
Select one or more Virtual Servers, and then click View original data.
Migrating Recovered Virtual Servers
Once a Disaster Recovery process has finished, the destination Compute Resources' RAM, VCPU, and free disk space may be overcommitted, especially if one or more resources in the destination Compute Resources' settings are set to "Unlimited". To avoid performance degradation and service disruption, consider migrating them to different Compute Resources to spread the load around more evenly.
Deleting the Virtual Servers' Original Configuration and Data
If the source Compute Resource has been restored, we recommend that you try and recover the data from the Virtual Servers' original disks by mounting them. Keep in mind that the recovered Virtual Servers are not recovered as they were at the moment the outage happened. They are recovered as they were at the moment the latest backup was created. Recovering Virtual Servers' data can help minimize the disruption to your customers.
Once you have made sure that you have recovered all the Virtual Servers' data you could and wanted to recover, we recommend that you delete the Virtual Servers' original configuration and data to avoid network conflicts and free up disk space.
Warning
Deleting the Virtual Servers' original configuration and data is permanent. It cannot be undone.
To delete the Virtual Servers' original configuration and data:
-
Go to the Disaster Recovery > Activities page.
-
Locate and click the desired Disaster Recovery process.
-
Select one or more Virtual Servers, and then click Delete original data.