Title here
Summary here
This document explains how to set up postpaid billing integration with any billing system except WHMCS, such as Blesta, Hostbill, or Ubersmith.
SolusVM offers hourly and monthly billing. Decide how much real money (in desired currencies) one token costs.
Note:
Tokens can only be integers.
We recommend that you prepare a detailed conversion table, for example:
| Tokens | Token Price in USD | Token Price in EUR |
| 1 | $0.00100 | €0.00091 |
| 10 | $0.01000 | €0.00910 |
| 100 | $0.10000 | €0.09100 |
| 1,000 | $1.00000 | €0.91000 |
| 10,000 | $10.00000 | €9.10000 |
Prerequisites: Assume that you have already added plans. If not, add plans before proceeding.
You now need to decide how much to charge for your plans. Each plan in SolusVM can have the hourly and the monthly price in tokens:
Tokens per hour is the price in tokens for using a resource for each hour.
For example, if you start a server and terminate it after five minutes, the server’s user has to pay the price for one hour.
Tokens per month is the price in tokens for using a resource for approximately the whole month.
Months have different lengths but the monthly price is fixed. To achieve this, you set the monthly price by calculating the monthly cap. Let’s see an example.
We have the hourly price of 7 tokens (equals $0.007/h). The whole 31-day month will then cost the following:
7 tokens × 24 hours × 31 days = 7 × 744 hours = 5208 tokens (equals $5.21)
People like round numbers. We can deduct 208 tokens ($0.21) and get the price of 5000 tokens ($5.00). This will be our monthly cap and the monthly price at the same time. SolusVM will choose which price (hourly or monthly) to charge depending on the monthly price.
For example, a user ran a server for 700 hours, which costs 4900 tokens. It is less than 5000 tokens of the monthly cap so the user will be charged hourly. Next month, the user ran a server for 730 hours, which costs 5110 tokens. It is more than 5000 tokens of the monthly cap so the user will be charged monthly ($5.00).
We recommend that you calculate your hourly and monthly prices before actually setting them in SolusVM. Below you can see an example of how we calculated prices using the conversion table shown in step 1.
| Plans | Tokens per hour | Aggregated tokens per month (tokens per hour × 24 hours × 31 days) | Aggregated price per month in USD | Tokens per month (as the fixed price) | Price per month in USD if “tokens per month” was applied |
| 1 Core, 1 GB RAM | 7 | 5,208 | $5.21 | 5,000 | $5.00 |
| 1 Core, 2 GB RAM | 14 | 10,416 | $10.42 | 10,000 | $10.00 |
| 2 Cores, 2 GB RAM | 21 | 15,624 | $15.62 | 15,000 | $15.00 |
| 2 Cores, 4 GB RAM | 28 | 20,832 | $20.83 | 20,000 | $20.00 |
Note:
In the example above, we have rounded up the monthly prices (the last two columns). It is more convenient for customers and it can serve as a monthly discount. You can decide whether to apply the same approach.
During the previous step, you created the detailed pricing table. You now need to set the hourly and monthly prices (the second and the fifth columns in the pricing table respectively) for plans in SolusVM:
Log in to SolusVM.
Go to Compute Resources > Plans.
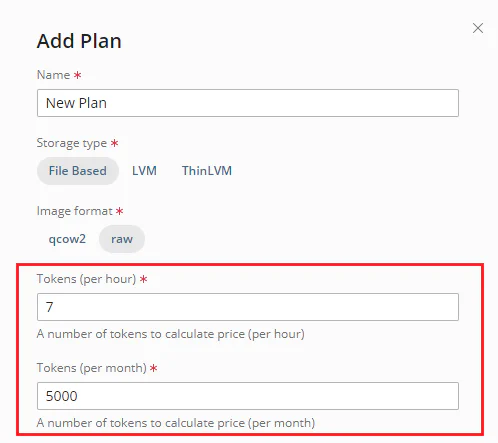
You can specify the token values while editing an existing plan or creating a new one:
Specify the hourly and the monthly price in tokens in Tokens per hour and Tokens per month respectively.
If you are creating a plan, also fill in the required fields.
Note:
If you set Tokens per month to “0”, only hourly billing will be available. If you set Tokens per hour to “0” but you specify the value for Tokens per month, then hourly billing will not be available. Customers will always be charged the fixed monthly price defined by Tokens per month.
Click Save.
The billing system configured with SolusVM must be the main database for SolusVM users. Only the billing system database must control which users have or do not have the permission to create servers.
However, SolusVM has a part of its interface called user area where users create servers. It is possible to bypass the billing system database by creating users directly in the user area. To prevent this, you need to disable registration in the user area:
Log in to SolusVM.
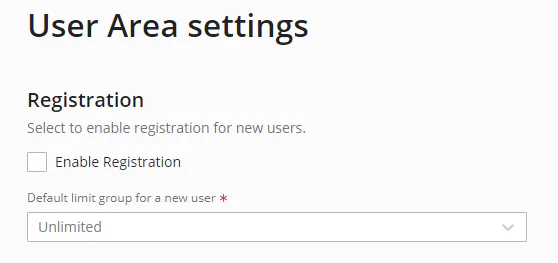
Go to Settings > User Area and clear the Enable Registration checkbox.
Click Save.
You have disabled registration in the user area. The billing system database is now the main database for SolusVM users.
Limit groups help you set limits on the number of servers a specific user can create and can keep in the running state. We recommend that you create limit groups and choose the default limit group for new users. Learn how to do so.
You now need to configure the GetTokenPricing endpoint on the billing system side.
You can easily configure it in a coding language of your choice.
You need this endpoint so that SolusVM can show prices to customers.
Note:
At the moment, you need to configure only the GetTokenPricing endpoint.
But we may extend the list of API endpoints in the future.
The GetTokenPricing endpoint has the following request and response parameters:
| Parameter | Type | Description | Required |
| `token` | string | Authorization token | No |
| `userid` | int | The user ID in the billing system | Yes |
| Parameter | Type | Description |
| `base_token_unit_cost` | float | The price of one token prior to any discounts and/or taxes. |
| `user_token_unit_cost` | float | The full and final price of one token including discounts and taxes. |
| `currency` | array | The array consisting of the currency formatting parameters: ISO code, prefix, suffix, number of decimals, thousands, and decimals separator. Example: ``` "currency": { "code": "GBP", "display_prefix": "\u00a3", "display_suffix": " GBP", "thousands_separator": ",", "decimals_separator": ".", "decimals_per_month": 2, "decimals_per_hour": 4 } ``` |
| `discounts` | array | The array of applied discounts that consists of the name, description, and multiplier. Example: ``` "discounts": { "name": "Special Client Group Discount", "description": "5% Recurring Discount", "multipler": 0.95 } ``` |
| `taxes` | array | The array of tax information including the tax type (compound or not) and rates (a label and a rate). Example: ``` "taxes": { "compound": true, "rates": [ { "label": "City Tax", "rate": 6 }, { "label": "State Tax", "rate": 2 } ] } ``` |
When SolusVM needs to display a price to a customer, SolusVM sends an API request with the user ID
to the GetTokenPricing endpoint:
curl -X POST "https://www.mybilling.com/solusio/api/"
\ -H "Accept: application/json"
\ -H "Content-Type: application/x-www-form-urlencoded"
\ -d "token=xxxxxxx&action=GetTokenPricing&userid=1"
The billing system then sends an API response with the price-related information, for example:
{
 "base_token_unit_cost": 1.34,
 "user_token_unit_cost": 1.0812,
 "currency": {
         "code": "GBP",
         "display_prefix": "\u00a3",
         "display_suffix": " GBP",
         "thousands_separator": ",",
         "decimals_separator": ".",
         "decimals_per_month": 2,
         "decimals_per_hour": 4
 },
 "discounts": [
         {
                 "name": "Special Client Group Discount",
                 "description": "5% Recurring Discount",
                 "multipler": 0.95
         }
 ],
 "taxes": {
         "compound": true,
         "rates": [
                     {
                             "label": "City Tax",
                             "rate": 6
                     },
                     {
                             "label": "State Tax",
                             "rate": 2
                     }
                 ]
         }
}
user_token_unit_cost in the response is the coefficient that reflects
all taxes, discounts, and special offers of a particular user.
SolusVM then multiplies user_token_unit_cost by the plan’s price in tokens,
gets the real price in the currency (pound sterling in our example),
and shows this price to the user.
You have configured the API endpoint on the billing system side. You can now enable the integration in SolusVM.
Log in to SolusVM.
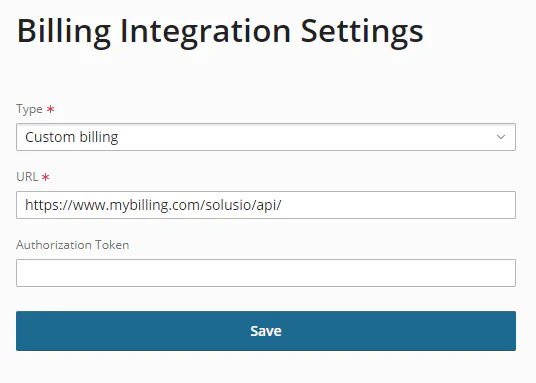
Go to Settings > Billing Integration.
Under Type, select Custom billing.
Specify the URL of the GetTokenPricing endpoint on the billing system side,
for example https://www.mybilling.com/solusio/api/
(Optional) The billing system may require tokens for authorization. If so, paste your billing system authorization token.
Click Save.
The billing system must manage users in SolusVM.
To set up this integration, you need to configure user management with SolusVM on the billing system side. When you do so, the billing system will be able to create, edit, delete, lock, and suspend users in SolusVM using the SolusVM API endpoint.
Note:
When integrating user management,
ensure that the billing system sends billing_user_id to SolusVM.
SolusVM needs to have billing_user_id to match users stored in the billing system
with those stored in SolusVM.
The billing system redirects users to the SolusVM user area. To help users access SolusVM without having to log in again, configure automatic logging in. To do so, you need to create an access token for a user first. Then use a login link that contains the token to authorize the user in the integration scripts:
GET https://www.solus-user-ui.com/auth/by_token/{access_token}As the last step, you need to configure the billing system to send API requests to the /usage SolusVM API endpoint.
At the end of the billing cycle, the billing system generates and sends invoices to users.
To calculate charges, the billing system must receive the consumed resources statistics
by sending API requests to the /usage endpoint.
You have finished integrating your billing system with SolusVM.