Title here
Summary here
If you are running a SolusVM 1 cluster, you can import your existing SolusVM infrastructure into SolusVM.
In this topic, you will learn about the following:
This document presumes that you are running a SolusVM 1 cluster and wish to update to SolusVM. An in-place upgrade is not available. Instead, you can import your existing SolusVM infrastructure into SolusVM.
Import is a one-time process that enables SolusVM to recognize and manage slave nodes and hosted VPSes in a SolusVM 1 cluster. It involves creating a new master node (called “management node” in SolusVM) and connecting all existing slave nodes (called “compute resources” in SolusVM) to it. Here is what the outcome of a successful import should look like:
Once the import is over, we strongly recommend that you stop the SolusVM 1 agent on all imported nodes by running the following command:
/usr/local/solus/bin/agent services-solusvm1 off
and only manage them via the SolusVM management node. If you have imported every slave node in SolusVM 1 and there are no virtual servers hosted on the master node itself, the SolusVM 1 master node can be decommissioned.
It is always preferable to run the latest version of software, one that is being actively developed and supported. After importing your existing SolusVM 1 infrastructure to SolusVM, you will be able to enjoy the following benefits:
Warning:
Before importing, make sure you have carefully read through this section!
There are a number of factors you need to take into account before beginning the import:
Make sure that you fully understand the implications of importing from SolusVM 1 to SolusVM to avoid unpleasant surprises and the disruption of your business processes.
Risks
Import from SolusVM 1 is pretty straightforward. However, there are always certain risks. Make sure you understand them before moving forward.
Make sure you have carefully read the information about the limitations of import and the changes between SolusVM 1 and SolusVM business logic found in this topic, and consider it in the context of your business. If a certain feature absent from SolusVM is vital for your customers, this may become a blocker for import, or at least require careful consideration on your part.
There is a possibility that SolusVM may misconfigure network limits during import.
There is a possibility that creating new virtual servers on imported compute resources via WHMCS may not be 100% smooth. We recommend testing this scenario before making it available to customers.
Although import was designed from the ground up to cause zero VPS downtime, in theory, some downtime is possible.
There is always a risk, however small, that we failed to consider some edge case that may cause complications under highly specific conditions.
Limitations
Importing from SolusVM 1 comes with a number of caveats and limitations. Consider them and plan accordingly.
KVM based virtual servers imported from SolusVM 1 require installation of Guest Tools. Guest Tools are possible to install from SolusVM admin interface. The following SolusVM features will not be available if Guest Tools are not installed:
These limitations do not apply to new virtual servers created in SolusVM and hosted on compute resources imported from SolusVM 1.
Guest Tools installation is now supported for the following guest operating systems:
Guest Tools installation support for CentOS 6 will be added soon. If you need support for other operating systems please contact technical support.
Certain SolusVM 1 features are missing from SolusVM and are not imported:
Additionally, existing KVM OS templates are not imported. SolusVM comes with OS images that serve the same function.
You can import entire slave nodes with all hosted VPSes. You cannot import individual VPSes.
You can import a slave node only if all VPSes hosted on it support import. A single VPS that does not support import prevents you from importing the entire node.
Only OpenVZ/Virtuozzo and KVM compute resources and virtual servers can be imported. XEN is not supported in SolusVM.
Slave nodes based on CentOS 5 and 6 cannot be imported.
Virtual server backups created in SolusVM 1 are not imported.
Resellers are not supported in SolusVM, and are therefore not imported.
Statistics data is not imported.
SolusVM does not support multiple PowerDNS servers.
Live migration of a virtual server from imported node to native compute resource is not possible now.
SolusVM creates reverse DNS records for IPv4 addresses in the standard form like 1.0.168.192.in-addr.arpa where the 1.0.168.192 part is generated automatically from all four octets of the IPv4 address. If a zone contains the IP address’ octets like 168.192.in-addr.arpa, then the record 1.0 will be created using the last two octets. SolusVM 1 creates records using only the last fourth octet. If you need to adhere to the way SolusVM 1 works, you can customize Reverse DNS Record name template in the IP block settings using the {{ fourth-octet }} variable.
The “Max Disk” values for slave nodes are converted from MB to GiB, rounded down.
Webhooks created in SolusVM 1 are not imported, and must be recreated manually. Learn how to create webhooks in SolusVM.
Enabled Two-factor authentication in SolusVM 1 is not supported and must be recreated again. Learn how to enable 2FA in SolusVM.
Terminology changes
Some entities familiar to you from SolusVM 1 have different names in SolusVM while conceptually remaining the same.
| SolusVM 1 Name | SolusVM Name |
| Master node | Management node |
| Slave node | Compute resource |
| VPS | Virtual server |
| Client | Customer |
| OS template | OS image |
Business logic changes
There are some important differences between SolusVM 1 and SolusVM business logic. Make sure you understand them before importing.
Warning:
Removing an imported customer’s account in SolusVM will delete all of that customer’s virtual servers. However, if a server has a backup, you can use it to restore the server.
In SolusVM, virtual server backups can be created both by the administrator and customers.
SolusVM does not send email notifications when a compute resource goes offline.
SolusVM API and CLI are not compatible with those of SolusVM 1. If you use either in your integrations, those integrations will need to be updated.
Before you can begin, there are a number of steps you need to take.
Note:
You cannot use the server hosting the SolusVM 1 master node for the SolusVM management node, or decommission it early. The SolusVM 1 master node must remain available until the import is finished.
Upgrade the SolusVM 1 master node to version 1.27.27 or later.
Make sure that there is network connectivity between the target SolusVM management node, the source SolusVM 1 master node, and every slave node you plan to import.
Make sure that it is possible to log in to the SolusVM 1 master node from the SolusVM management node via SSH using public key authentication as either the root user or a different user that has root privileges.
Verify the network settings for every slave node you plan to import are correct. You can check them in SolusVM 1 > Nodes > Edit node > Network Interface.
If you have PowerDNS integration set up in the SolusVM 1 cluster, set up PowerDNS integration in the SolusVM cluster as well.
By default, the CLIENT role applies to imported users. If you need to set a custom role with custom permissions for users’ accounts from the SolusVM 1 cluster, use the The default role for new users setting in Settings > User Area.
We strongly recommend that you create new backups of all virtual servers hosted on slave nodes you are planning to import and make sure that you can restore them. This way, you will be able to return your SolusVM 1 cluster to working condition should anything go awry.
We strongly recommend that you lock slave nodes during import to make sure no new VPSes are provisioned to them during import.
To import your SolusVM 1 cluster into SolusVM, first, you need to create an import process. You can use a single import process to import any number of slave nodes and hosted VPSes as long as all of them are a part of a single SolusVM 1 cluster. To import from multiple SolusVM 1 clusters, create a separate import process for each one.
To create an import:
root user. You can provide a different user name, but unless that user has root privileges, the import will fail. This user will be used to log in to master and slave nodes during import.Here is what a correctly filled out form may look like:
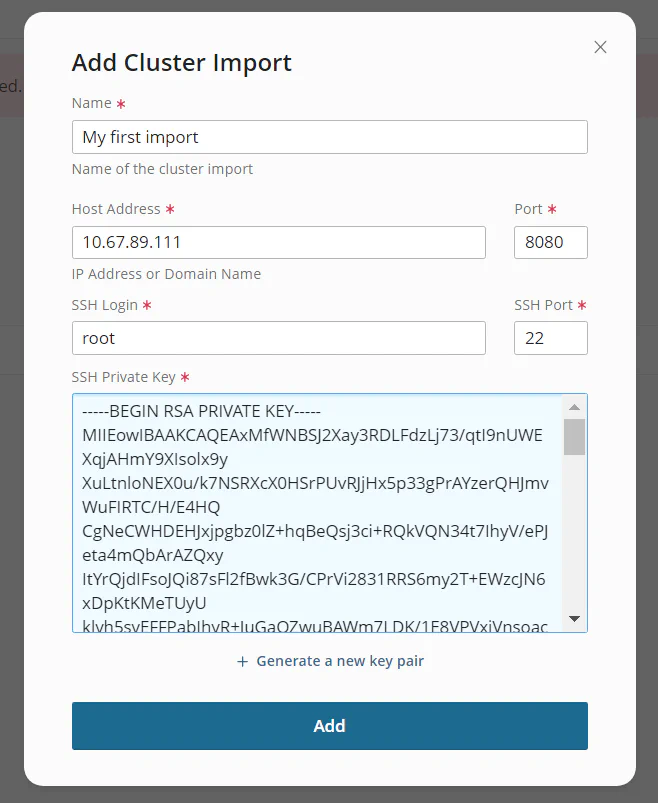
SolusVM will try to connect to the SolusVM 1 master node using the information you provided. This will generally take a few seconds. If, after that, the result is “Prepared”, you are ready to begin. Otherwise, you will need to resolve any issues before proceeding.
Once the result is “Prepared”, you are ready to proceed. You can now import one or more slave nodes from the SolusVM 1 cluster with all hosted VPSes.

Note:
You can safely delete an import process at any time with no loss of data.
To import virtual servers:
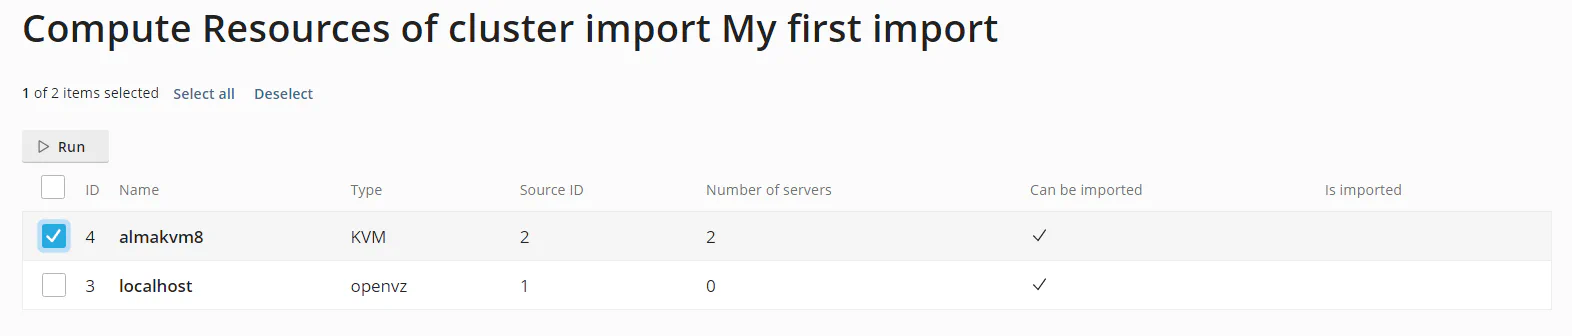
The status of the import process will change to “Importing” to indicate that the selected slave nodes are being imported. Once the status changes back to “Prepared”, it means that the selected slave nodes have been imported into SolusVM. You can find the imported slave nodes in Compute Resources, and all VPSes hosted on them in Virtual Servers.
Warning:
Do not remove any entities (VPSes, clients, and so on) you have imported from either SolusVM or SolusVM 1 unless you are prepared to lose them. Imported entities are governed by both SolusVM and SolusVM 1 with full authority. Deleting an imported VPS in SolusVM removes it from the SolusVM interface and results in the loss of all associated data.
If, after an import process is finished, the imported node and virtual servers have the “unavailable” status in SolusVM, there were issues during import. Such virtual servers are running as normal, but cannot be managed from SolusVM.
To fix “unavailable” virtual servers:
Once the “install agent” task finishes successfully, the imported compute resource(s) and virtual server(s) will no longer be marked as “unavailable” in SolusVM.
Note:
You can run import again for a node that has already been imported. As a result, entities (IP addresses and blocks, plans, customers, and so on) created since the last import will also be imported. Previously imported entities are not re-synced or updated in SolusVM, even if they have changed since the last import.
Post-import actions
If you are satisfied with the results of the import and no longer plan to manage the imported slave node(s) via SolusVM 1, we recommend that you stop SolusVM 1 services on those nodes by running the following command:
/usr/local/solus/bin/agent services-solusvm1 off
To roll back the changes made on a slave node during import, run the following command on that slave node:
/usr/local/solus/bin/agent services-solusvm1 on
If any slave nodes belonging to the same SolusVM 1 cluster have not yet been imported, you can repeat the steps above to import them using the same import process. If all slave nodes in the SolusVM 1 cluster have been imported, the import process no longer serves any purpose and can be safely deleted.
If you are using WHMCS, to be able to continue to charge the customers you import from SolusVM 1, you need to update their products. You can do it automatically using the SolusVM converter, or manually via the WHMCS interface. You can also convert your SolusVM 1 products to SolusVM ones. Either way, you need to integrate SolusVM with WHMCS first.
To integrate SolusVM with WHMCS:
You can now start updating your customers’ products.
Note:
To be able to update imported products automatically, php-cli must be installed on the server hosting your WHMCS instance.
To update a single imported product for all customers automatically:
Note:
This will convert all services related to the product
Log in to your WHMCS instance.
Create a corresponding SolusVM product if it has not already been created.
Log in to the server hosting your WHMCS instance via SSH, and then change the working directory to the one the SolusVM provisioning module is installed in (modules/servers/solusvm2vps).
Run the php converter.php products command to see the list of all SolusVM 1 and 2 products. For example, here’s what the output may look like:
Existing SolusVM v1 Products:
ID 	 Name
10 	 SolusVM foo product
20 	 SolusVM bar product
Available for converting SolusVM v2 Products:
ID 	 Name
30 	 SolusVM foobar product
Run the php converter.php run <SolusVM 1 ID> <SolusVM ID> command to convert all customers using the specified SolusVM 1 product to the specified SolusVM product. In the example above, run php converter.php run 10 30 to convert all customers using the “SolusVM foo product” to the “SolusVM foobar product”.
The imported customers will now be billed for the SolusVM product.
To update a single imported product for a single customer manually:
Log in to your WHMCS instance.
Create a corresponding SolusVM product if it has not already been created.
Go to Clients, locate the client, and then click the corresponding Product/Service entity.
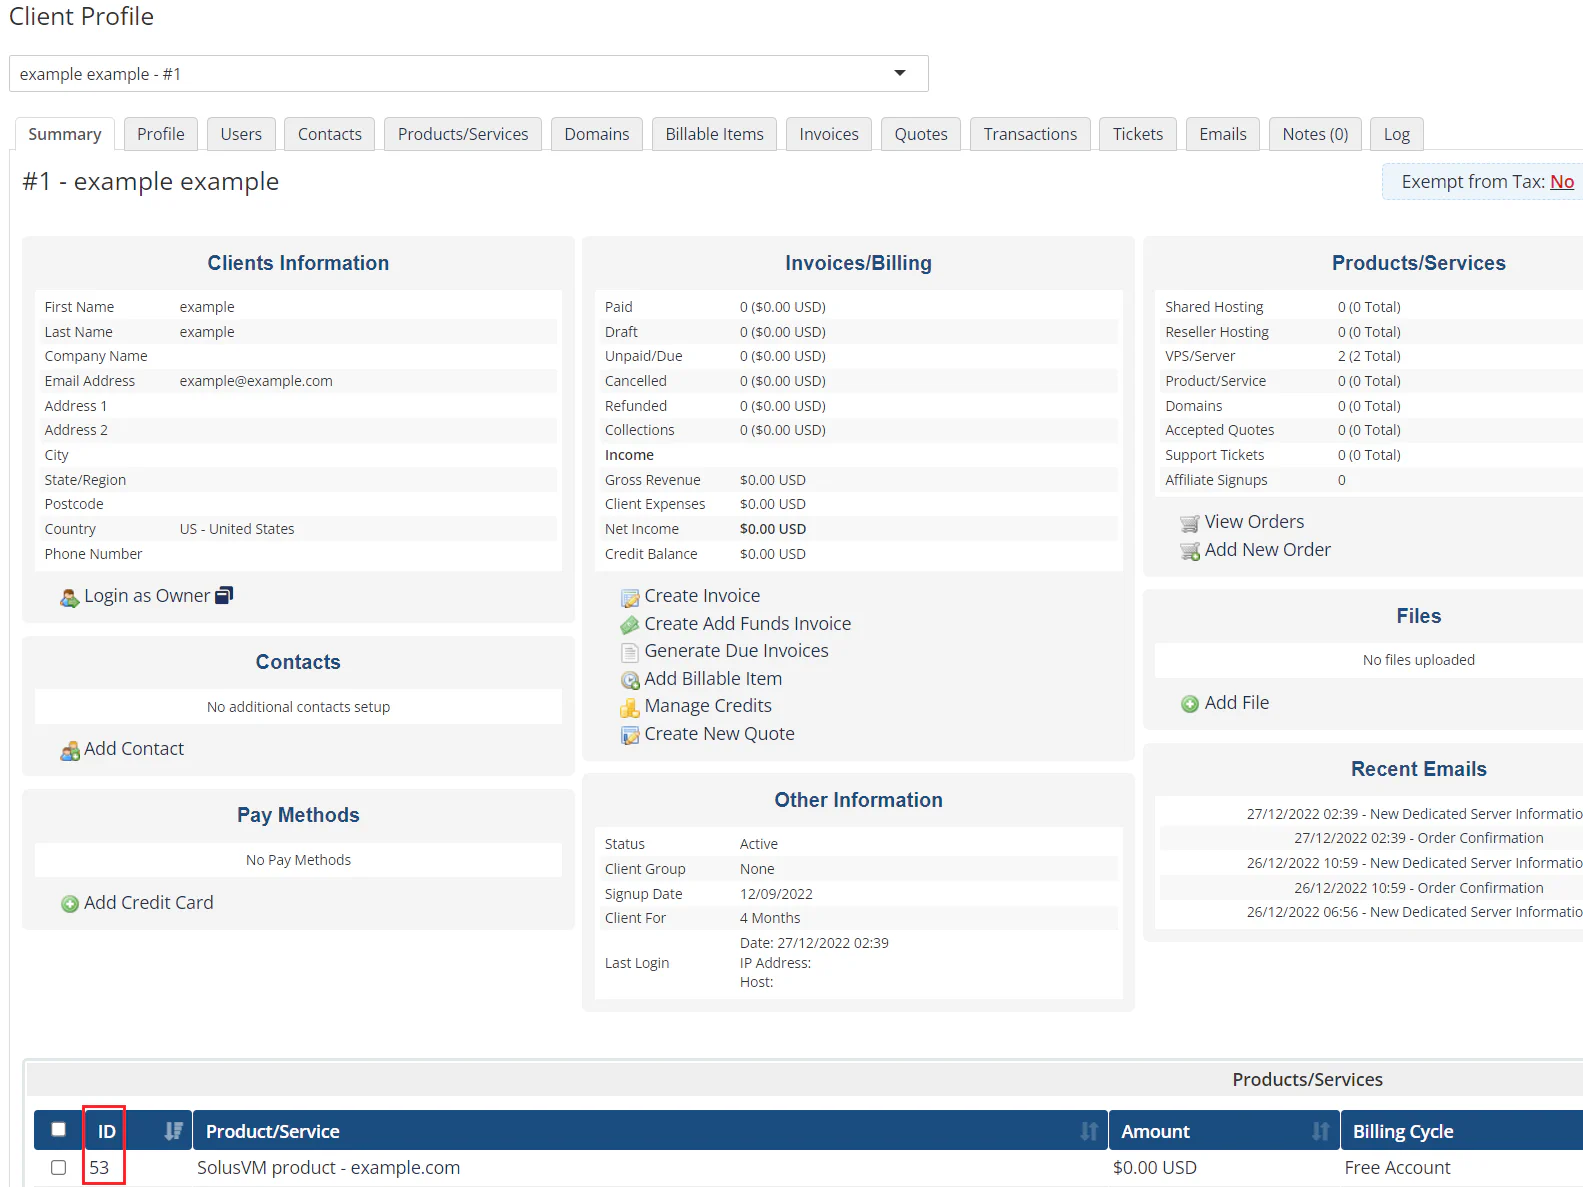
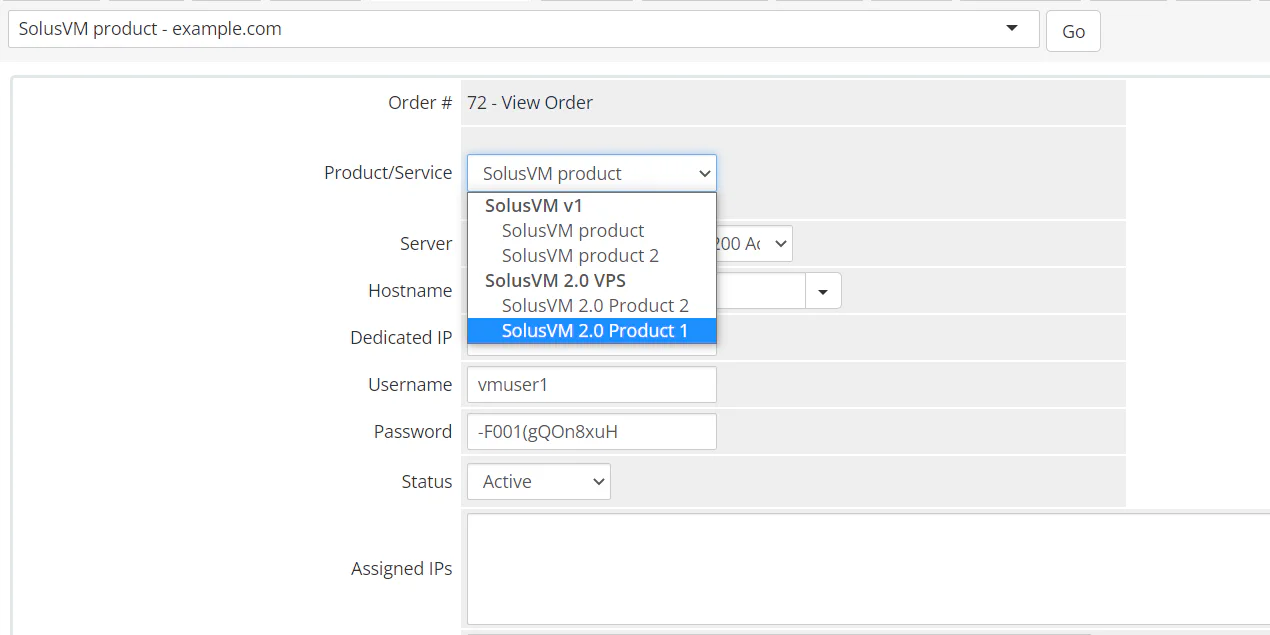
Change the Product/Service type to the product from step 2.
Click Sync account on the product page.
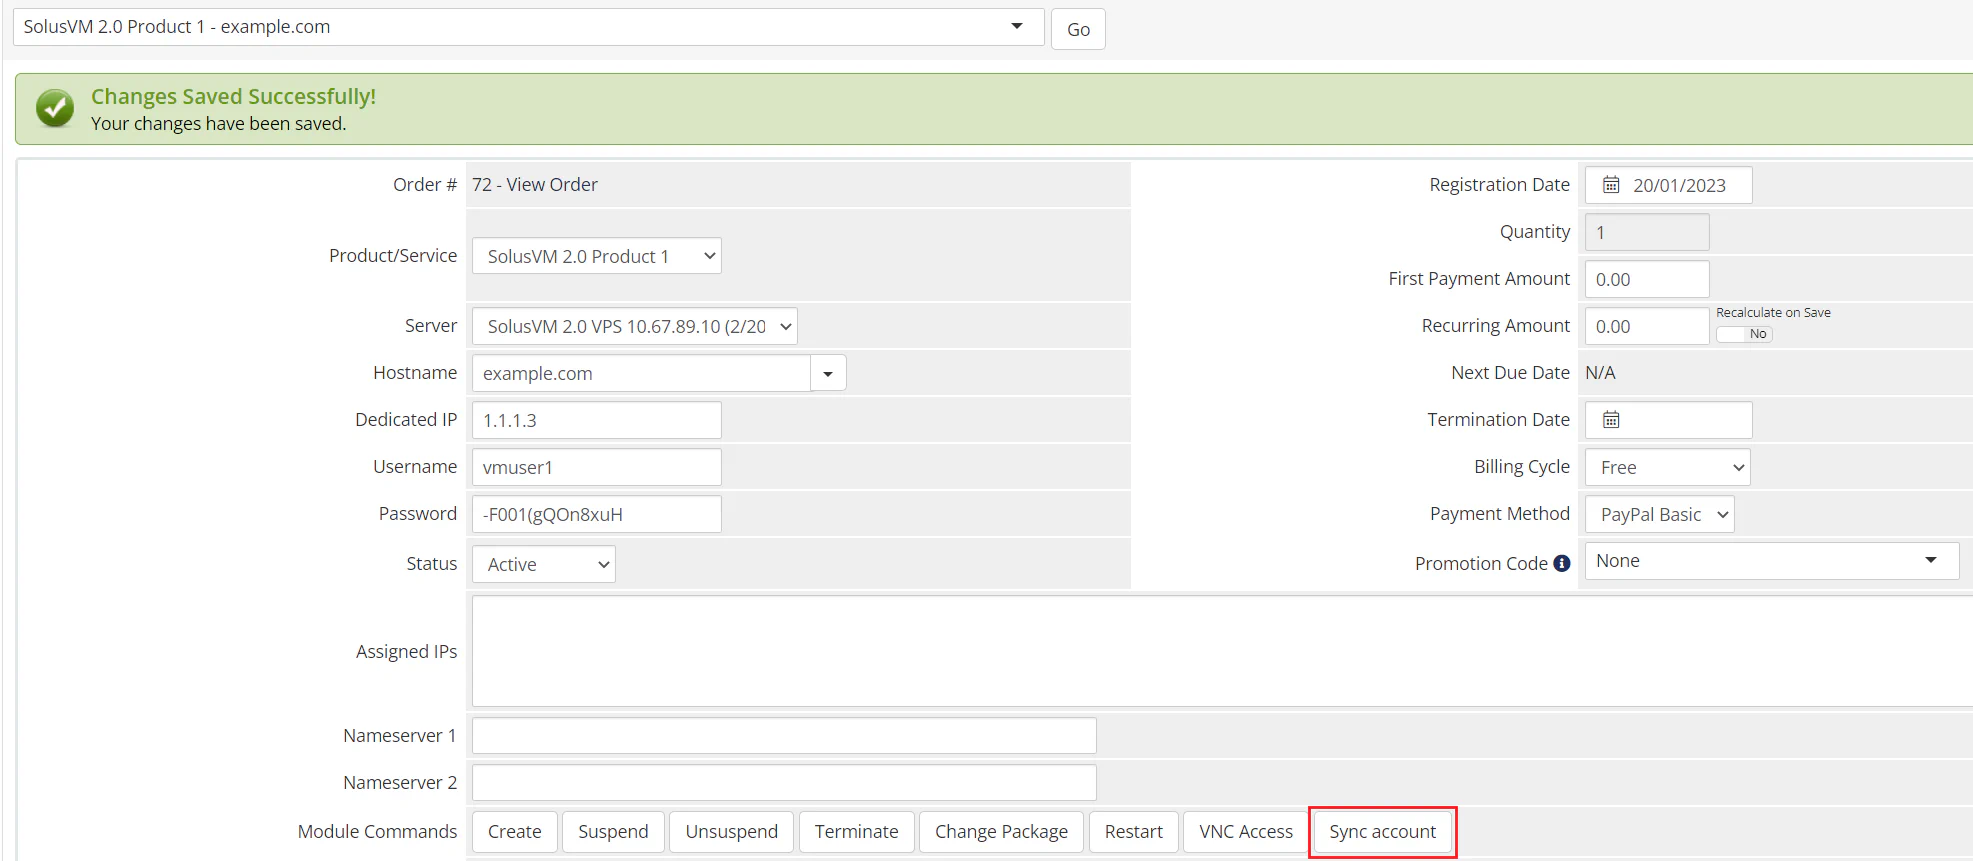
The imported customer will now be billed for the SolusVM product. For every imported customer you want to keep billing via WHMCS, repeat this procedure for each imported product they have.
To convert your SolusVM 1 products:
Log in to the server hosting your WHMCS instance via SSH, and then change the working directory to the one the SolusVM provisioning module is installed in (modules/servers/solusvm2vps).
Run the php converter.php reconfigure command with the “–mn-server” option to to convert your SolusVM 1 products to SolusVM products. For example:
php converter.php reconfigure --mn-server=2
Here, --mn-server=2 is the ID of the SolusVM management node. You can look it up in your WHMCS instance
System Settings > Servers.
Note:
In some cases, you may need to provide the IDs of plans, OS images, and/or locations in case those cannot be retrieved automatically. In this case, run php converter.php help to learn about the necessary options.
Customers will now be billed for the converted SolusVM products.
This option allows conversion only of those WHMCS services that have their related SolusVM 1 virtual servers imported. Services of not imported virtual servers will not be changed.
Create Cluster Import in SolusVM and import necessary nodes.
Log in to your WHMCS instance.
Create a corresponding SolusVM product if it has not already been created.
Create Location configurable option for the product from step 3. Do not fill its sub options.
Create custom fields for the product from step 3. Names of custom fields:
| Field Name | Field Type | Tick Box |
|---|---|---|
| VCPU | Text Box | Admin Only |
| Memory | Text Box | Admin Only |
| Disk Space | Text Box | Admin Only |
| Total traffic limit monthly | Text Box | Admin only |
Log in to the server hosting your WHMCS instance via SSH, and then change the working directory to the one the SolusVM provisioning module is installed in (/whmcs_root/modules/servers/solusvm2vps).
Execute php converter.php get-import-info to fetch information about imported virtual servers and locations from SolusVM cluster import and display WHMCS services available for conversion. Available flags:
``--mn-server`` - ID of SolusVM Management node added in _WHMCS_ > _System Settings_ > _Servers_. (optional)

``--cluster-import`` - ID of cluster import that should be used. It can be found in _SolusVM_ > _Cluster Imports_. (optional)
Execute php converter.php get-vps-resources. This command fetches resources of imported virtual servers from SolusVM. Resources are - vCPU, RAM, Disk Space, Total traffic limit monthly, location ID and location name. Available flags:
``--mn-server`` - ID of SolusVM Management node added in _WHMCS_ > _System Settings_ > _Servers_. (optional)
Execute php converter.php create-location-suboption - it fills Location configurable option for the product you want to use for conversion with imported locations. Available flags:
``--product-id`` - ID of SolusVM Product for option creation. Can be found in URL of a product page in _WHMCS_ > _System Settings_ > _Product/Services_ > necessary product, for example `https://example.com/admin/configproducts.php?action=edit&id=5`. 5 is ID. (required)

``--mn-server`` - ID of SolusVM Management node added in _WHMCS_ > _System Settings_ > _Servers_. (optional)
Execute php converter.php convert-to-one-product - converts SolusVM 1 services of imported virtual servers to SolusVM and creates custom fields for each service. Available flags:
--product-id - ID of SolusVM Product for option creation. Can be found in URL of a product page in WHMCS > System Settings > Product/Services > necessary product, for example https://example.com/admin/configproducts.php?action=edit&id=5. 5 is ID. (required)