Title here
Summary here
In SolusVM, you and your users can save time and installation efforts by creating virtual servers with preinstalled applications. Applications help you and your users get projects up and running as soon as or shortly after a server is created.
A number of applications are built in and available in SolusVM right out of the box, for example, WordPress on Plesk, MariaDB, NextCloud, and others. You can also add your own custom applications.
You can deploy virtual servers with applications that have already preinstalled licenses. At the moment, you can configure licensing for cPanel & WHM and Plesk only. If you do so, when users create servers with custom cPanel & WHM or Plesk, they will not need to buy and install cPanel & WHM or Plesk licenses themselves.
You can add custom applications to the list of applications. Once added, custom applications will also become available for installation when you and your users create servers.
To add a custom application:
Prepare the application image. It is based on the OS image, which you can get from OS vendors (for example, Ubuntu and CentOS). The OS image can have the application preinstalled or the application can be installed when a server is created.
Note:
If you are adding a custom application with a preinstalled license, skip this step and go to step 2. Custom applications with preinstalled licenses use already prepared OS images.
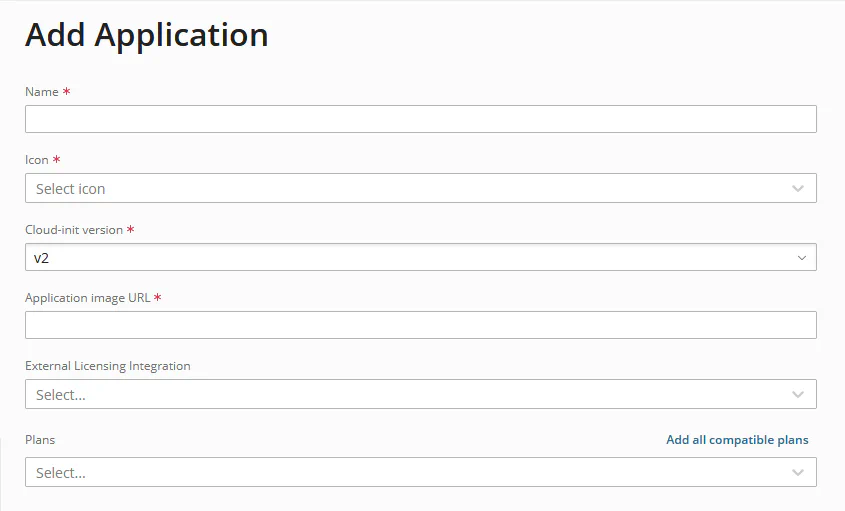
Go to Images > Applications and then click Add Application.
Give your application a recognizable name.
Select the application icon. We tried to guess what applications you might want to add. If the icon of the desired application is not on the list, choose one of gray icons, which show the applications’ types (for example, “Server”, “Shop Cart”, or “Storage”).
Select the cloud-init version. Most modern OSes (for example, CentOS Stream or Ubuntu 22) support cloud-init v2.
If you are adding a custom cPanel & WHM application with a preinstalled license, specify v2-centos.
If you are adding a custom Plesk application with a preinstalled license, the cloud-init version depends on the OS you want Plesk to run on:
for Plesk on CentOS, specify v2-centos, for Plesk on Ubuntu—v2.
Provide the URL to the application image.
If you are adding a custom cPanel & WHM application with a preinstalled license, specify the following URL:
https://images.prod.solus.io/solus-io-centos-7-cpanel.qcow2If you are adding a custom Plesk application with a preinstalled license, the URL depends on the OS you want Plesk to run on:
Plesk on CentOS:
https://autoinstall.plesk.com/images/plesk-centos-7-latest.qcow2Plesk on Ubuntu:
https://autoinstall.plesk.com/images/plesk-ubuntu-22-latest.qcow2If you are adding a custom cPanel & WHM or Plesk application with a preinstalled license, select the name of the licensing integration you have created earlier (for example, “cPanel Pro” or “Plesk Web Admin Edition”).
The Plans field defines which plans can be used for new virtual server creation for this new application. Plans that are not bound with the application will be visible but cannot be selected for new virtual server creation.
If you want your users to see and install the application when they create servers, keep it visible. You may also want to hide the application from users, for example, if it is not ready for production yet. In this case, turn off the visibility.
Select the login type. It depends on your application and defines how users will log in to it:
Note:
A custom cPanel & WHM application uses a URL for login. A Plesk one uses the “Script (JS)” login type.
If the application uses a URL for login, select “URL” and provide the login link in the field on the right, for example, https://{{ hostname }}/?login={{ login }}&password={{ password }}.

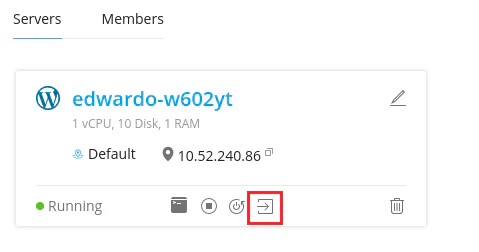
Users will log in to your application by clicking the login link on the server’s card and their application’s credentials will be passed inside the URL.
If you are adding a custom cPanel & WHM application with a preinstalled license, specify the following URL: https://{{ hostname }}:2087/.
If you select the “Script (JS)” login type, provide the JavaScript login script in the “Login link script” field. Users will log in to your application by clicking the login link on the server’s card and their application’s credentials will be sent via a POST request.
If you are adding a custom Plesk application with a preinstalled license, specify the following login script:
fetch('https://{{ domain }}:8443/api/v2/cli/admin/call', {
  body: '{ "params": [ "--get-login-link" ] }',
  headers: {
    Authorization: 'Basic '+ btoa('admin:{{ passwd }}'),
    "Content-Type": "application/json"
  },
  method: "POST"
})
  .then(function(response) {
    if (!response.ok) {
      throw Error(response.statusText);
    }
    return response.json();
  })
  .then(function(data) {
    var link = data.stdout.split(/\r?\n/);
    openWindow(link[0]);
  })
  .catch(function() {
      openWindow('https://{{domain}}:8443/');
  });
For some non-web-based applications (for example, databases), you need to show the credentials users will use to log in. In this case, select “Info (HTML)” and provide the logging in information as HTML code in the “Login link script” field. Users will log in to your application by using the credentials they see in the HTML form.

Sometimes you do not need any log in credentials (for example, if you add a custom OS build as an application). In this case, select “None”.
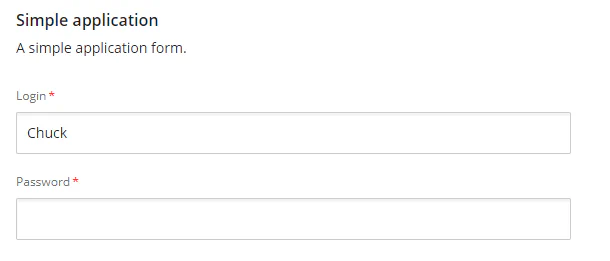
Edit the JSON schema. When users create servers and choose your application, they will see the dynamic form based on this JSON schema. The dynamic form is usually the registration form, which collects credentials of the application administrator. For example, the sample JSON present in the field generates the following dynamic form:
If you are adding a custom cPanel & WHM application with a preinstalled license, specify the following JSON schema:
{
  "title": "cPanel",
  "description": "Create an exceptional hosting experience.\nIndustry leading hosting platform with world-class support.",
  "type": "object"
}
If you are adding a custom Plesk application with a preinstalled license, specify the following JSON schema:
{
  "title": "Plesk",
  "description": "Next-Level server management platform",
  "type": "object",
  "required": [
    "domain",
    "user",
    "rootmail",
    "passwd"
  ],
  "properties": {
    "domain": {
      "type": "string",
      "title": "Hostname"
    },
    "user": {
      "type": "string",
      "title": "Username",
      "default": "admin"
    },
    "rootmail": {
      "type": "string",
      "format": "email",
      "title": "Administrators Email"
    },
    "passwd": {
      "type": "string",
      "title": "Password",
      "format": "password",
      "pattern": "^[a-zA-Z0-9_-]*$",
      "minLength": 5
    }
  }
}
In the “User data template” field, provide the cloud-config script that will be executed by cloud-init
right after the first server boot. The script must contain post-configuration steps necessary for your application to be up and running,
for example: creating the application’s administrator with the credentials provided in the dynamic form,
creating users and users’ groups, and so on.
The script is written in the YAML format. For reference on how to write the script, use the cloud-init documentation. To write the script, you will most probably need to use the following variables:
{{ login }} and {{ password }}.If you are adding a custom cPanel & WHM application with a preinstalled license, specify the following script:
    write_files:
      - path: /root/setup.sh
        permissions: '0755'
        content: |
          #!/bin/bash
          HOSTNAME={{ hostname }}
          match=$(echo "${HOSTNAME}" | grep -oP '^(?!\-)(?:[a-zA-Z\d\-]{0,62}[a-zA-Z\d]\.){1,126}(?!\d+)[a-zA-Z\d]{1,63}$')
          if [ -z "$match" ]; then
            hostnamectl set-hostname "${HOSTNAME}.local.domain"
            HOSTNAME="${HOSTNAME}.local.domain"
          fi
          setenforce 0
          /usr/local/cpanel/bin/set_hostname "${HOSTNAME}"
          /usr/local/cpanel/cpkeyclt
    runcmd:
      - sh /root/setup.sh
      - rm -f /root/setup.sh
If you are adding a custom Plesk application with a preinstalled license, specify the following script:
    #cloud-config
    write_files:
      - path: /root/config.ini
        permissions: '0755'
        content: |
          domain="{{ domain }}"
          rootpw="{{ passwd }}"
          user="{{ user }}"
          passwd="{{ passwd }}"
          activation_key="{{ externalIntegrationResponse.keyIdentifiers.activationCode }}"
          rootmail="{{ rootmail }}"
    runcmd:
      - [ curl, "https://raw.githubusercontent.com/solusio/applications/master/plesk/setup", -o, "/root/setup.sh" ]
      - [ chmod, +x, "/root/setup.sh" ]
      - sh /root/setup.sh | while IFS= read -r line; do printf "%s %s\n" "$(date)" "$line"; done >>/var/log/logfile
      - echo "complete" > /var/www/vhosts/default/htdocs/__setup_complete.html
      - rm -r /root/setup.sh
Note:
For custom Plesk application with a preinstalled license, you must use the {{ externalIntegrationResponse.keyIdentifiers.activationCode }} variable.
This variable contains the activation code from the licensing API response.
Note:
If you are not sure what JSON schema, cloud-config script, or another setting a custom application must have,
use the corresponding built-in application (if any) as a reference. To see the built-in application settings,
go to Images > Applications and click the
![]() icon next to the application.
icon next to the application.
Click Save.
Your custom application was added.
You add an application with a preinstalled license in two stages. You set up an integration with the application’s licensing API first. Then you add a custom application that will use the integration to issue licenses for created virtual servers.
Note:
You can only configure licensing for custom applications.
To add a cPanel application with a preinstalled license:
Contact cPanel, LLC and ask to create an account for you. You will use the account’s credentials to set up your integration.
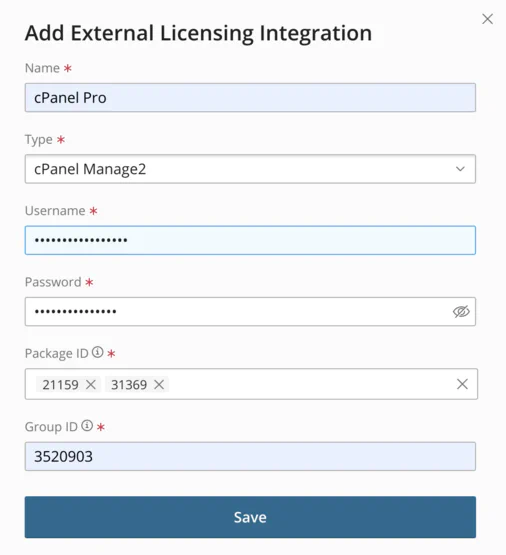
Go to Settings > External Licensing Integrations and then click Add Integration.
Give your integration a recognizable name, for example, “cPanel Pro”.
Under Type, keep “cPanel Manage2”.
Specify the username and password for your cPanel Manage2 account.
Specify the list of package IDs and group ID (for example, 21159 and 3520903 respectively) of the license type you want to preinstall with cPanel.
See all available package IDs and group IDs.
Click Save.
Add a custom cPanel application using this procedure.
Note:
cPanel Manage2 has a limitation that can prevent virtual servers from getting preinstalled licenses. If a cPanel license is activated 8 times within 15 minutes on various servers that use the same IP address, cPanel Manage2 will block all further license activations for your cPanel Manage2 account. It means that users will no longer receive preinstalled cPanel licenses. Once users log in to cPanel, they will also see the following error message: “The cPanel license server replied that the license has been activated on too many machines (600)”. To resolve the issue, contact the cPanel customer service team.
To add a Plesk application with a preinstalled license:
Join the Plesk Partner Program and ask to create an account for you. You will use the account’s credentials to set up your integration.
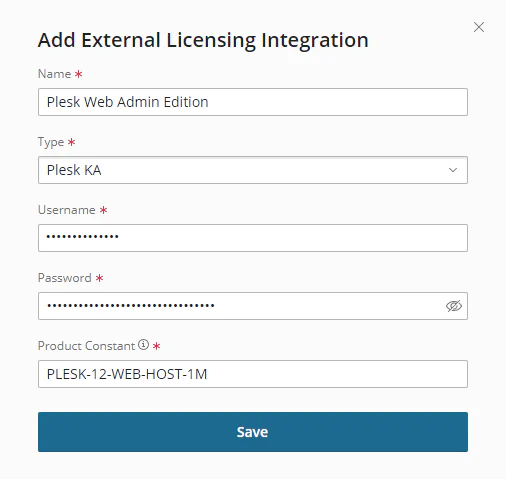
Go to Settings > External Licensing Integrations and then click Add Integration.
Give your integration a recognizable name, for example, “Plesk Web Admin Edition”.
Under Type, select “Plesk KA”.
Specify the username and password for your Plesk KA account.
Specify the product constant (for example, PLESK-12-WEB-HOST-1M). This constant will determine the license type to be preinstalled with Plesk. See all available product constants.
Note:
If you are not sure which product constant to specify, contact your Plesk sales manager.
Click Save.
Add a custom Plesk application using this procedure.
You can always edit a custom application.
To edit an application:
Go to Images > Applications and click the
![]() icon next to the custom application you want to edit.
icon next to the custom application you want to edit.
Note:
You cannot edit built-in applications.
Make the desired changes, and then click Save.
By default, all built-in applications are visible: users can see and install the applications when they create servers. In some cases, you may want to hide applications, for example:
To change the visibility of an application:
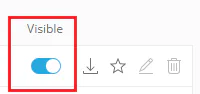
Go to Images > Applications.
Turn the visibility on or off for the desired application.
You may want to download the application image. It can be helpful if, for example, you added a custom application and want to check if the application image URL is correct.
To download an application’s image:
Applications provide similar controls for VM settings as Operating Systems. You can use Applications to define default configurations for your VMs upon creation or reinstallation.