Title here
Summary here
Notice: This is the legacy documentation. For the latest features and updates, refer to our current SolusVM documentation.
Auto FTP Backup is a solution for automated VPS backups. The Auto FTP backup is configured per node.
To configure it:
Open SolusVM admin panel > Nodes > List Nodes > {Node} > Auto FTP Backup
Specify FTP server settings: IP or Hostname , Username, Password,
Port, Directory and tick the checkbox Passive(optional) in
FTP Server Settings: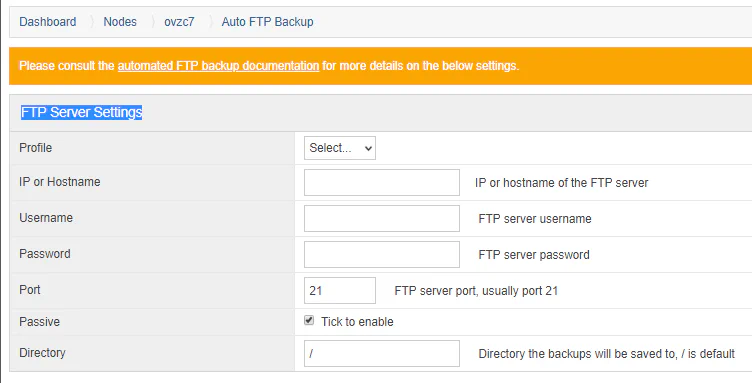
In Profile drop-down menu you can select predefined FTP Server.
Tick the checkbox Enabled in Backup Settings section to turn
the backup on and click Update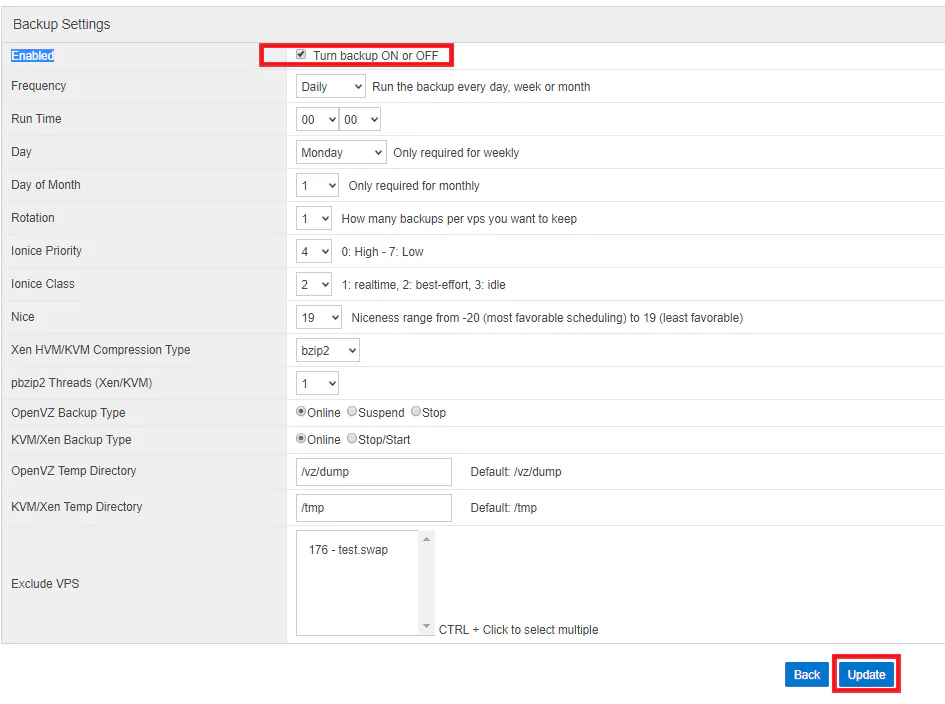
(Optional) Tune the rest of Backup Settings.
If ticked, backups will be enabled and will run at a specified time.
Settings are day, week and month.
The time your want the backup to run. This setting is for day, week and month and is in 24 hour format.
The day you want the weekly backup to run.
The day of the month you want the monthly backup to run.
The number of backups you want to keep. If set to 1, the system will overwrite the last backup. If set higher than 1, it will rotate the backups.
From 0 - the highest priority, to 7 - the lowest priority.
Idle: A program running with idle IO priority will only get disk time when no other program has requested disk IO for a defined grace period. The impact of idle IO processes on normal system activity should be zero. This scheduling class does not take a priority argument.
Best effort: This is the default scheduling class for any process that has not asked for a specific IO priority. Programs inherit the CPU nice setting for IO priorities. This class takes a priority argument from 0-7, with lower number meaning higher priority. Programs running at the same best effort priority are served in a round-robin fashion. This is usually recommended for most applications.
Real time: The RT scheduling class is given first access to the disk, regardless of other processes running in the system. Thus, the RT class needs to be used sparingly, as it can starve other processes. Similarly to the best effort class, 8 priority levels are defined for this class denoting how big a time slice a given process will receive on each scheduling window. This class should be avoided for all heavily loaded systems.
Range goes from -20 (highest priority) to 19 (lowest).
bzip2 : bzip2 is a freely available, patent free (see below), high-quality data compressor. It typically compresses files to within 10% to 15% of the best available techniques.
pbzip2 : pbzip2 is a parallel implementation of the bzip2 block-sorting file compressor that uses pThreads and achieves near-linear speedup on SMP machines.
The number of processors pbzip2 can use.
Online : This option backs up the container while it is online. There is no downtime with this option.
Suspend : This option backs up the container and suspends/resumes during the backup process. This option has a small amount of downtime.
Stop : This option shuts down the container and then generates the backup. Out of all three options, this one causes the most downtime.
Online : This option backs up the virtual server while it is online. There is no downtime with this option.
Stop/Start : This option shuts down the container and then generates the backup. Out of the two options, this one causes downtime.
The temp directory where the temp backup file will be stored before the upload to the FTP backup server. Default is /vz/dump.
The temporary location where the backup process will store the file before uploading to the FTP server. Typically, you will not have enough room to store the backup on the standard mounted partitions. Below is a guide on how to create a mounted partition from free space on your logical volume group.
1.Find out your logical volume group name:
[root@dev1 ~]# vgdisplay
  --- Volume group ---
  VG Name               vps
  System ID
  Format                lvm2
  Metadata Areas        1
  Metadata Sequence No  159
  VG Access             read/write
  VG Status             resizable
  MAX LV                0
  Cur LV                6
  Open LV               3
  Max PV                0
  Cur PV                1
  Act PV                1
  VG Size               931.50 GB
  PE Size               32.00 MB
  Total PE
  Alloc PE / Size       6368 / 199.00 GB
  Free  PE / Size       23440 / 732.50 GB
  VG UUID               dArWSA-njx2-quNr-BYJc-HAdh-lXXf-5t3SHA
From the above output you can see that the VG name is ‘vps’ and has 732.50GB free space.
2. Create a new logical volume to store the backup. In this example we created a 100GB logical volume called backup. You need a logical volume slightly bigger than your largest virtual server:
[root@dev1 ~]# lvcreate -L100G -n /dev/vps/backup
  Logical volume "backup" created
3. Format and mount the new logical volume. We mounted it
as /home/backup:
mkfs.ext3 /dev/vps/backup
mkdir -p /home/backup
mount /dev/vps/backup /home/backu
It should now show when you run df:
[root@dev1 ~]# df -h
Filesystem            Size  Used Avail Use% Mounted on
/dev/sda1             901G   91G  763G  11% /
tmpfs                 384M     0  384M   0% /dev/shm
/securetmp            962M   18M  896M   2% /tmp
none                  384M  104K  384M   1% /var/lib/xenstored
/dev/mapper/vps-backup
                       99G  188M   94G   1% /home/backup
4. Make sure it mounts at boot time. For the above settings, adding
this code to /etc/fstab will make sure it mounts on boot:
/dev/vps/backup /home/backup ext3 defaults 1 1Select any virtual servers to exclude from the backup cycle.