Title here
Summary here
To help prevent data loss, you and your users can back up and restore servers.
This document explains how to do the following:
Note:
A server’s backup is a copy of the server’s disk only. A backup does not contain the server’s configuration.
Note:
Incremental backups are available only for plans with the ThinLVM storage type.
A full backup is a copy of the whole server disk without its configuration. An incremental backup contains only the data that has changed since the last backup date.
Compared to full backups, incremental ones have their advantages:
Note:
It is not always true if, for example, a server disk accumulated a large number of changes since the last backup.
However, incremental backups also have disadvantages. They take more time to be restored, and it is easier to accidentally lose the possibility to restore them.
If, after you weigh the pros and cons, you have decided not to use incremental backups, you can stop reading here and move on to setting up the backup feature.
If you have decided to enable incremental backups, let us dig deeper in how they function. This information will be useful when you enable incremental backups in a plan.
You restore full backups independently of each other.
When you enable incremental backups, you get a sequence of backups dependent on each other. We call this sequence a backup chain. Each backup chain starts with a full backup and includes one or more incremental backups. The number of backups in a chain is its length. On the picture below, the chain length is four.
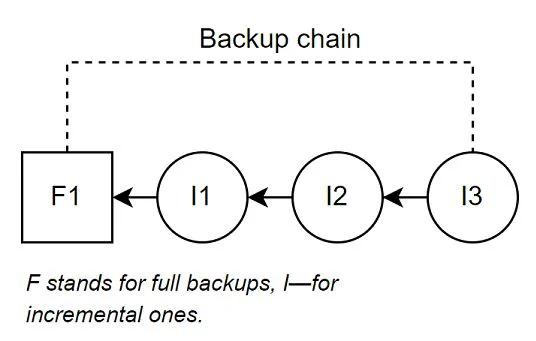
Each incremental backup depends on the previous incremental one and on the full backup that starts the chain. If you lose or damage any of the previous backups in the chain, you will lose the ability to restore from subsequent incremental backups. Backup chains, especially long ones, are fragile. We recommend that you keep them short by setting backup limits.

When enabling backups in a plan, you can set the limit of backups a user can have per server. This limit includes all types of backups: manual, scheduled, full, and incremental (if any).
If you offer only full backups, the backup limit matches the number of backups a user sees in the User interface and the number of backups stored on a backup node.
When you enable incremental backups, the following things happen:
With enabled incremental backups, the backup limit operates differently. It still matches the number of backups a user sees in the User interface but no longer matches the actual number of backups stored on a backup node. This happens because you cannot delete a single incremental backup without breaking a backup chain.
SolusVM stores backups that exceed the backup limit until the whole backup chain goes beyond the backup limit. Then SolusVM deletes the whole backup chain from a backup node.
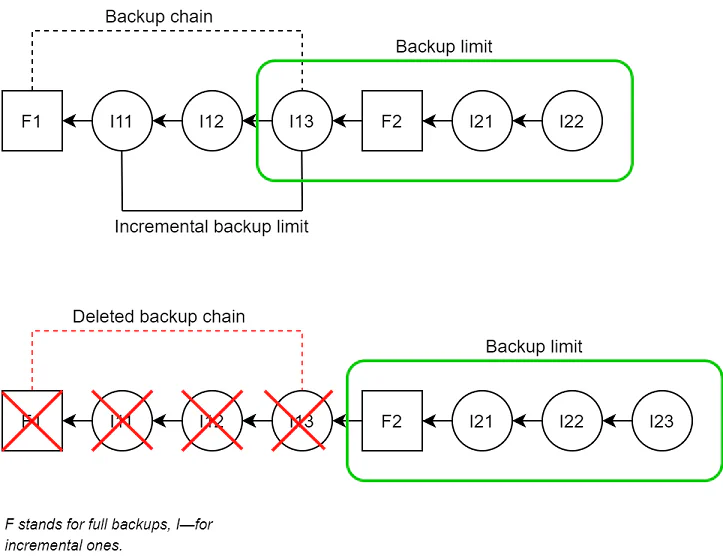
All of this happens under the hood. Users don’t see any difference between full and incremental backups in the User interface. They also don’t know that they have some backups stored on a backup node beyond the backup limit.
However, you as the SolusVM administrator see the actual number of backups stored on a backup node both in the Administrator and User interfaces.
Before you and your users can start creating backups, you need to do the following:
A backup node must meet the following requirements:
Installed rsync.
Firewall rules must allow connections to the backup node’s SSH port from the management server and compute resources.
Enough disk space to store backups. You can roughly estimate the minimum necessary disk space using the following formula:
A number of servers × server disk space × 8 (the allowed number of backups per server + 1)
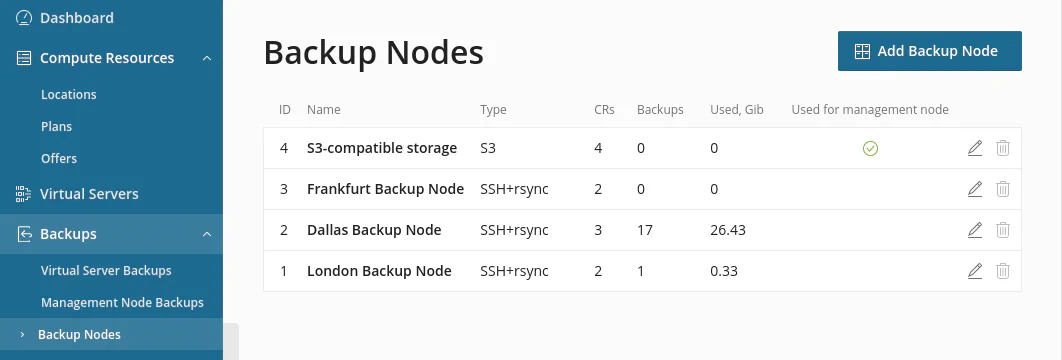
To add a backup node:
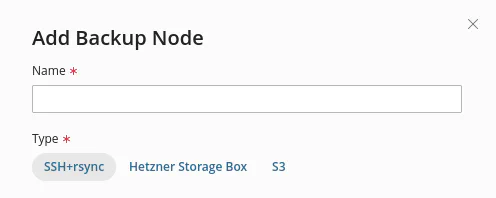
Go to Backups > Backup Nodes and click Add Backup Node.
Give your node a recognizable name.
Choose Backup Node type. Currently supported backup node types are:
Select one or more compute resources whose servers you want to back up.
Specify the hostname or IP address of a server that you want to add as a backup node.
Keep the default 22 SSH port or specify a custom one (if any).
Provide the SSH login and SSH private key.
Specify the path where backup files will be stored.
Note:
To specify several paths, add the same server as a backup node several times specifying one path for each case.
Click Save.
You have added the backup node.
Now you need to enable the backup feature in a plan’s settings.
To enable the backup feature:
Go to Compute Resources > Plans and add a new plan or edit an existing one.
Select “Offer backups” and specify the backup price.
You can set the backup limit: the maximum number of backup files users can store (including full, incremental, scheduled, and manual backups).
Keep the default limit as it is, change it, or choose not to limit the number of users’ backups by selecting “Unlimited”. Your choice depends on the estimated number of future servers, the number of backup nodes, and their disk space.
Note:
You can later customize the backup limit for each server created according to the plan.
If the plan has the ThinLVM storage type, you can also enable incremental backups by selecting the corresponding checkbox. If you enable incremental backups, you will need to limit their number for each full backup. We recommend that you keep the default value of three.
Increasing this value will increase the time necessary to restore backups and make the restoration less reliable.
If you want to enable incremental backups, we recommend that you first :ref:read about a backup chain and backup limit <backup-chain>.
Click Save.
You have set up everything necessary for backups. You and your users can now back up and restore servers.
You and your users can create both scheduled and manual backups. You can back up manually at any time or you can schedule backups to be created automatically and periodically.
Note:
All new servers have the backup feature turned off by default. You and your users turn it on individually for each server.
To back up a server:
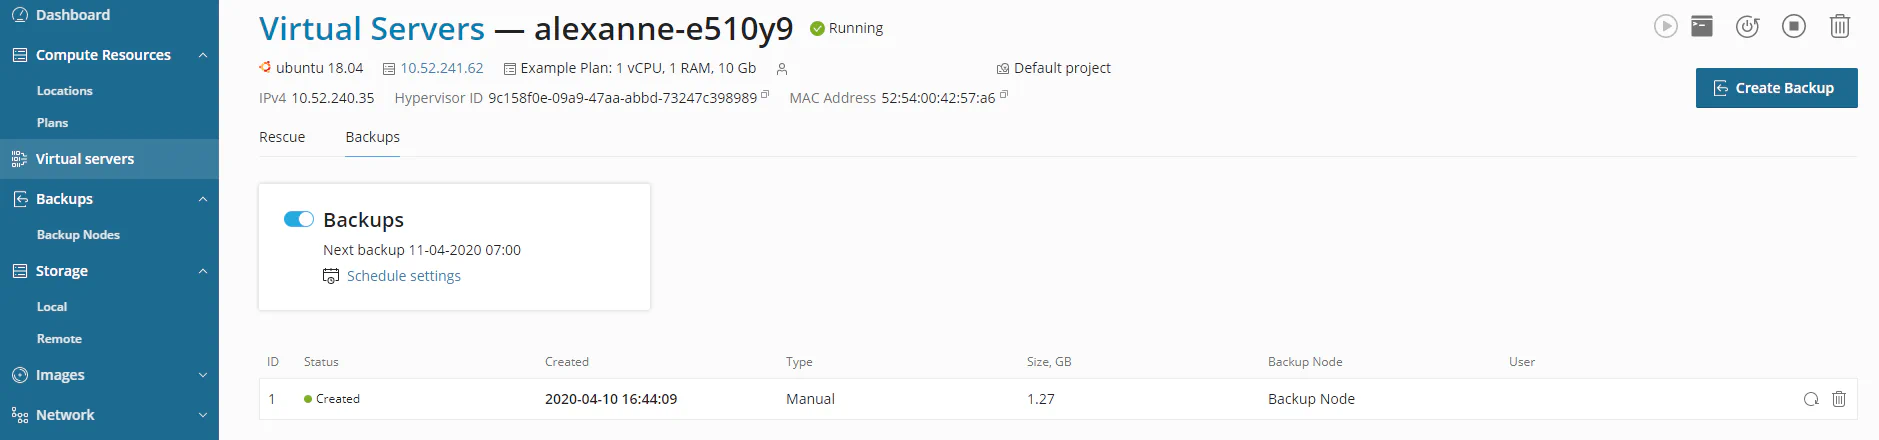
Go to Virtual Servers, click the hostname of the server that you want to back up, and then go to the “Backups” tab.
Turn on “Backups” and then click Enable.
Choose how to create a backup:
To schedule a backup, click “Schedule settings” and select how often and when backups will be created. If you are not satisfied with the backup limit of the plan, you can customize it for the server.
When the limit is exceeded, backups are automatically rotated. See more information about backup rotation.
Once you have finished with schedule setting, click Save Changes. Backups will now be created regularly at the specified time and frequency.
Note:
To prevent data loss and get peace of mind, we recommend that you schedule backups.
To create a manual backup, click Create Backup. Backing up will start right away if no previous backup tasks are in the queue.
Created backups will be shown in the list.
Note:
Users schedule backups in the user interface (go to Projects, click “…servers”, click the name of the server for which you want to schedule backups, and then go to the “Backups” tab). At the moment, users can create manual backups only via the API.
The backup node and compute resources have settings to set the number of concurrent backup operations, namely backup creation and restoration.
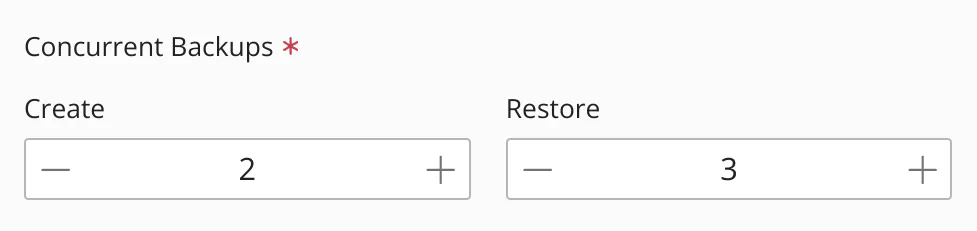
The default values of these settings are 1. It means that one backup node can process one backup creation and one restoration at a time. And a compute resource can do the same. With the default settings, the backup process happens the following way depending on your configuration:
By changing the default settings, you can specify the exact number of backup operations to be run simultaneously. However, to determine this number, you need to take into account the following:
Let us have a closer look at the settings using the following example.
The number of concurrent backups for the management node is 3 for backup creation and 3 for restoration. The number of concurrent backups for a compute resource attached to the management node is 3 for backup creation and 1 for restoration. The compute resource has 4 deployed servers.
In this case, it is possible to back up only 3 servers at a time, because the management node setting for backup creation (3) is less than the number of servers (4). The fourth server backup will be queued until the previous backup tasks are finished. At the same time, it is possible to restore only one server. Although the management node setting allows 3 concurrent restoration tasks, the compute resource setting allows only one. To be able to restore all 4 servers at a time, change the values of the management node and compute resource settings to 4.
Note:
Backup creation and restoration can be concurrent regardless of the value of the settings.
Note:
If you specify large values for the settings (for example, 100 concurrent backup operations), make sure that the system bandwidth supports it. Otherwise, backup restoration and creation may fail.
Backup restoration overwrites all data stored on the server with data stored in a backup.
Warning:
A server with the qcow2 image format loses its snapshots after being restored from a backup. It happens because of the way snapshots are implemented for qcow2.
To restore a backup:
Restoring a backup usually takes one minute to start. The system processes restoring tasks one after another, one restoring task at a time.
To create a new virtual server with a backup:
After the system creates the new virtual server, it restores the selected backup to the new virtual server. You can view the restore progress in the Tasks section of the Dashboard interface.
Deleting a virtual server does not automatically delete its backups but does delete its snapshots. SolusVM keeps backups of deleted servers until the SolusVM administrator deletes them manually.
Warning:
A deleted server restored from a backup does not recover its snapshots.
To restore a backup of a deleted server:
Go to Backups > Virtual Servers Backups.
On the list of backups, locate one that belongs to the deleted server you want to restore.

Note:
You can filter the list to show only backups of deleted servers.
Click the
![]() icon next to the backup you want to restore.
icon next to the backup you want to restore.
Select the following:
Click Restore.

This irrevocably deletes a backup from the backup node where it is stored.
You as the SolusVM administrator can delete backups manually or have them rotated and deleted automatically.
SolusVM automatically deletes backups if you’ve selected the backup limit in the corresponding plan:
You can also delete backups manually but with the following limitations:
You cannot delete individual incremental backups.
You can delete the following:
Note:
Users cannot delete any backups.
To delete a backup manually:
SolusVM offers two ways to copy servers and prevent data loss: to create backups and to create snapshots. Although backups and snapshots serve more or less the same purpose, they have differences, which you can see in the table below:
| Parameter | Backups | Snapshots |
| Migration a virtual server between Compute Resources | Virtual server which have backups can be migrated between compute resources. | Virtual server which have snapshots cannot be migrated between compute resources. |
| Saved data | The server’s disk copy (without configuration). | The server’s disk copy (without configuration) for all snapshots except qcow2. (qcow2) The server’s disk copy and memory state. |
| Storage place | Backup node. | Compute resource for all snapshots except qcow2. (qcow2) Compute resource and the snapshot server's disk file. |
| Creation speed | Varies greatly from minutes to hours. Depends on a backed up server disk size, HDD speed, and network speed. | Almost instant. |
| Consumed disk space | The server's disk space. | Less than the server disk space for all snapshots except the first one. Snapshots are incremental. |
| Enabling | Turned on individually for each server. | Turned on for a plan. |
| Ways to lose | Delete the backup node. | Delete the compute resource. (qcow2) Delete the snapshot server's disk file. Delete the snapshot's virtual server. |
| What happens after their virtual server was deleted | Kept until the SolusVM administrator deletes them manually. | Automatically and irrevocably deleted. |