Title here
Summary here
This document provides a step-by-step workflow for customers using SolusVM. You will learn how to register an account, create projects to organize servers, deploy virtual machines, and connect to manage them.
To register as a customer:
Go to https://<management-server-hostname>/login or https://<management-server-IP>/login.
Go to the “Register” tab.
Provide the email (it will be used as your login) and password.
Read the Privacy Policy, accept it, and click Register.
You are now logged in to SolusVM.
SolusVM sends an email with a confirmation link to the specified email address. The link is valid for 24 hours. To complete registration and get full access to SolusVM, follow the confirmation link.
After a customer confirmed registration, they can log in to SolusVM.
To log in as a customer:
https://<management-server-hostname>/login or https://<management-server-IP>/login.A customer needs to create a project. Projects group servers: each server is created under a particular project.
Note
“Default project” already exists right from the start. You, the administrator, is a project member of the default project.
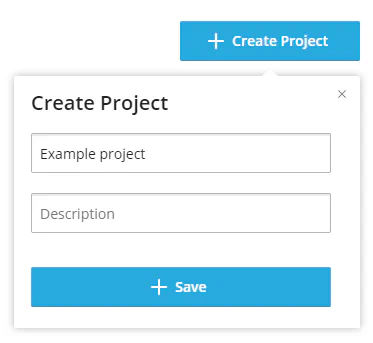
To create a project:
Go to Projects, click Create Project, and then give a project the name and description (optional).
Click Save.
The project is created and customers can now create servers.
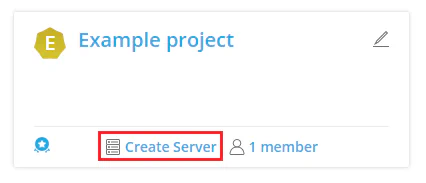
To create a server:
Go to Projects and, under the desired project, click Create Server.
Select a location (if any).
Select an operating system.
(Optional) Select the application that you want to be preinstalled on the server. For most applications, you need to specify credentials and other necessary information.
Select a plan.
(Optional) Select an offer for a primary disk or an additional disk:
To access the server command line as root, add an SSH key.
To do so, click Add SSH Key, click Generate a new key pair, and then click Add SSH Key.
SolusVM automatically creates a key pair: downloads the private key and pastes the public key.
(Optional) You can preconfigure this server and future ones by, for example, creating additional users or user groups in the system, running the desired commands at the first boot, and so on. To do so, click User Data, fill in the “User Data” textbox (to see reference, click “Sample”), and then click Set.
Note
Once you configure “User Data” for a Linux-based (CentOS, Debian, Alpine Linux, Ubuntu) and Windows servers, the data will be automatically used later when you deploy another Linux-based or Windows server.
Use the default hostname, generate a new one, or type the hostname yourself.
(Optional) You can change the default description of the server or keep the description as it is.
Click Create.
The server was created.
To see all servers created under a specific project, go to Projects and then click the project name.
To manage a server, you need to connect to its command line. You can do so in a variety of ways:
root and the SSH key pair that you created while deploying the server.root password. Customers receive the root password by email
if you have set up sending automatic email notifications.